Showing posts with label Tutorial. Show all posts

Tuesday, 28 August 2012

Sesame Street Characters Cupcake Tutorial

I've posted a detailed 4 part series on how to make the Sesame Street Character Cupcakes that I made for my nephew's 1st birthday party, but thought it might be a good idea to post a condensed version here, to make it easier for someone doing all four characters - Elmo, Cookie Monster, Oscar and Big Bird (for the detailed version, click on the preceding links).  Once again, thank you to Emma (11 yrs old) for helping me with the facial features on Elmo, Cookie Monster and Oscar, and Sophia (9 yrs old) for being my tutorial photographer.

Supplies Needed
cupcakes: my Hershey's awesome chocolate cake recipe here
icing: delicious icing recipe here (I use a little bit of cream cheese to cut the sweetness)
Wilton no taste food colouring - red, yellow, blue, green
white chocolate wafers (candy melts) - two per cupcake
chocolate icing for pupils
light blue icing (small amount)
light pink icing (small amount)
chocolate chips
orange peanut M&Ms
Oreo cookies
mini chocolate chip cookies - one for each Cookie Monster
marshmallows - one per Big Bird cupcake
red fruit roll up
star tip
leaf tip (optional but awesome for Big Bird's feathers)
round tip
icing bags (make your own like I do - see tutorial here)

Pipe red icing onto the cupcake using a star tip.  
Break apart some Oreo cookies, remove the icing (eat it!) and split them in half. One Oreo goes a long way - in case math isn't your strong suit, one Oreo makes 4 smiles! Place the Oreo smile near the bottom of the cupcake.
Add two white chocolate wafers (sometimes also called candy melts) which are basically pieces of white chocolate that look like Elmo eyes. Place them protruding slightly off the top and make sure they're touching.
Using a small round tip, pipe chocolate icing on Elmo's eyes - for the most realistic eyes, make sure to pipe the pupils in the centre and slightly cross-eyed. 
 Then place an orange peanut M&M in between the eyes. If you have peanut allergies, other options would be orange jelly beans or other orange coloured candies. And yes, I totally picked through our local grocery store's bulk bin section, only taking the orange ones!
And voila!  Elmo!


Pipe blue icing onto the cupcake using a star tip.
Place white chocolate wafers (candy melts) at the top of Cookie Monster's head 
Then shove a mini chocolate chip cookie into Cookie Monster's "mouth area". 
Using a round tip, pipe chocolate icing onto the white chocolate wafers, making sure the pupil is at the bottom right "corner" for the left eye, and the top left "corner" for the right eye.
And voila! Cookie Monster!


Pipe green icing onto the cupcake using a star tip.
Break apart the Oreos, scrape off (and eat!) the icing, break the Oreos in half and shove the cookie right into Oscar's mouth area. You want him to look like he's grimacing, not smiling! I tried the upside down smile-turned-frown, but that just looked weird. We did this and it worked for me! 
 Also put the white chocolate wafers (aka candy melts) on for his eyes. Oscar's eyes are not on the top of his head like Elmo and Cookie Monster, so make sure to put them lower down, and make sure they are not touching each other. Perfectionist, anyone?! 
I wasn't sure I'd have enough chocolate icing left to use for Oscar's unibrow, but Emma came up with a fantastic idea - use upside down mini chocolate chips! Stagger them close together to get that accurate bushy unibrow. 
Pipe chocolate icing for the pupils - centred and not as cross-eyed as Elmo's. 
And voila! Oscar the Grouch!


Note:  Big Bird takes forever!  Consider yourself warned.

Now, technically you could just pipe yellow icing on top of the cupcake like we did with the other characters, but not if you're wanting realistic looking feathers!
So, first start by taking a large marshmallow and cutting a triangle off one end to make the beak shape.  I also ended up trimming the bottom off slightly because it looked too tall.  This also had the added benefit of exposing the sticky inside of the marshmallow, helping it to stick to the cupcake.  You could also make it stick by applying icing in between the marshmallow and the cupcake, but I found that this was sufficient. Make sure to place the beak near the bottom of the cupcake to leave room for the eyes and for the proportions to look right.
Next, take some red fruit roll up (Fruit by the Foot) and put it on the inside of the marshmallow beak, trimming it to the right shape.  I found I had to take the marshmallow off to do this well, but you  might be able to do it with it on.
Next, slather some yellow icing on the outside of the beak and smooth it out as best you can with a knife dipped in warm water.
Using a leaf tip, pipe yellow icing on the cupcake in layers, starting with the outside and working your way in. Totally looks like feathers!!
Place the white chocolate wafers (aka candy melts) on top of the beak and have them slightly separated.  Then, using a round tip, pipe light blue icing as the lower eyelid, light pink icing as the upper eyelid (both directly on top of the white chocolate wafer) and chocolate as the pupils, near the bottom of the eye and very slightly cross eyed.
And voila!  Big Bird!


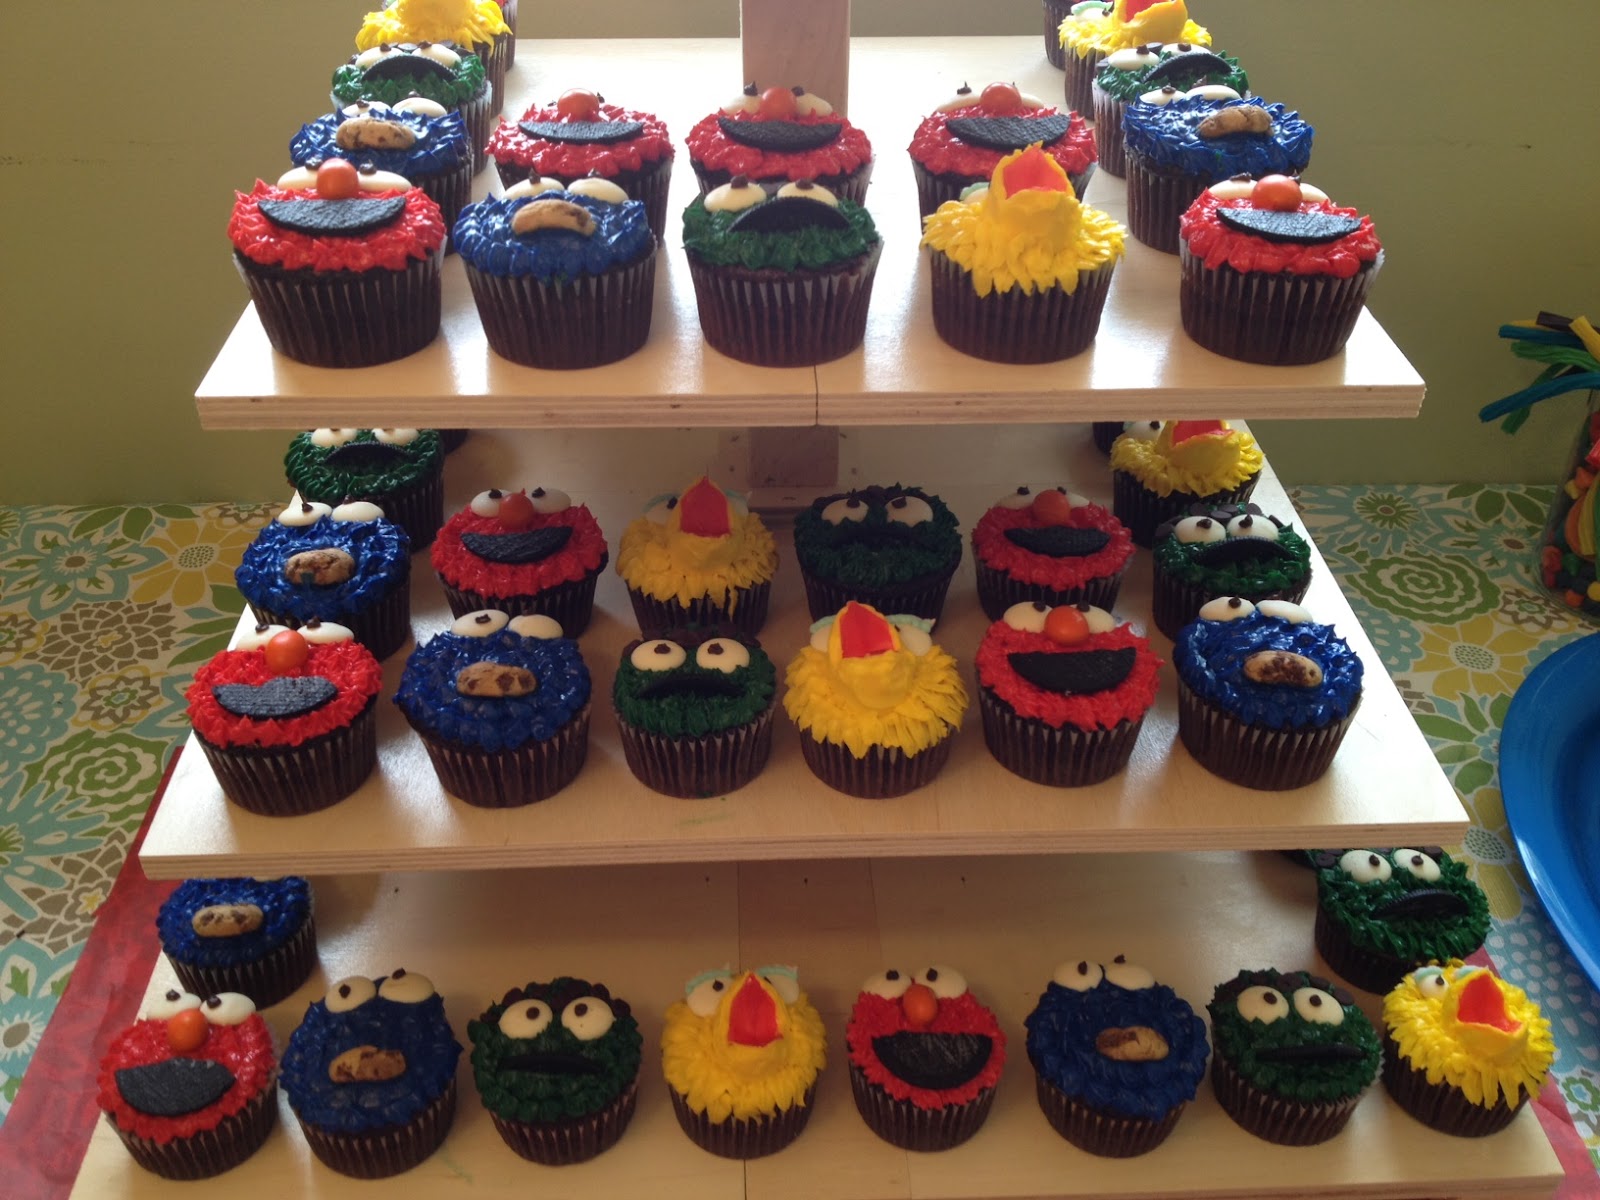
With that, may I present to you the Sesame Street Character Cupcakes - Elmo, Cookie Monster, Oscar the Grouch and Big Bird!


Big Bird: Sesame Street Characters Cupcake Tutorial - finale!

Yes, I saved the best for last.  Or rather, the worst.  By far the worst.  You have no idea.  Well, you will if you try this.  Big Bird was almost the death of me.  Actually, scrap that.  I almost killed Big Bird.

Hey, nobody said this was a kid-friendly post.

Either way, yes, this is the finale to my Sesame Street Character Cupcake Tutorial.  So far we've done Elmo, Cookie Monster and Oscar the Grouch.  All three of these characters were fairly simple and followed the same basic steps - star piped icing and awesome candy facial features.  But with Big Bird, we're moving into different territory.  Don't say I didn't warn you.  Big Bird took me longer than Elmo, Cookie Monster and Oscar put together.

That being said - here goes!

For Big Bird you will need....
cupcakes (see subtle hint recipe here)
one large marshmallow per cupcake
red fruit roll up
icing coloured with Wilton's no taste yellow food colouring
two white chocolate wafers (aka candy melts) per cupcake
light blue icing (small amount)
light pink icing (small amount)
chocolate icing (small amount)
leaf tip


Now, technically you could just pipe yellow icing on top of the cupcake like we did with the other characters, but not if you're wanting realistic looking feathers!

So, first start by taking a large marshmallow and cutting a triangle off one end to make the beak shape.  I also ended up trimming the bottom off slightly because it looked too tall.  This also had the added benefit of exposing the sticky inside of the marshmallow, helping it to stick to the cupcake.  You could also make it stick by applying icing in between the marshmallow and the cupcake, but I found that this was sufficient. Make sure to place the beak near the bottom of the cupcake to leave room for the eyes and for the proportions to look right.

Next, take some red fruit roll up (Fruit by the Foot) and put it on the inside of the marshmallow beak, trimming it to the right shape.  I found I had to take the marshmallow off to do this well, but you  might be able to do it with it on.

Next, slather some yellow icing on the outside of the beak and smooth it out as best you can with a knife dipped in warm water.

Using a leaf tip, pipe yellow icing on the cupcake in layers, starting with the outside and working your way in.

Totally looks like feathers!!


Place the white chocolate wafers (aka candy melts) on top of the beak and have them slightly separated.  Then, using a round tip, pipe light blue icing as the lower eyelid, light pink icing as the upper eyelid (both directly on top of the white chocolate wafer) and chocolate as the pupils, near the bottom of the eye and very slightly cross eyed.


After about 3 1/2 hrs of work, don't they look fantastic?!


And here are all four characters displayed together at the party (my brother made the tiered cupcake holder).

 Aren't they adorable?!

And, other than Big Bird, they're actually surprisingly easy to make!


DIY Ziplock Icing Bag Tutorial

I used to have a reusable icing/pastry bag, but the hole at the tip wore out so much the shaped tips slid out too much and icing oozed out the sides.  Not exactly conducive to decorating with any sort of detail.  I found a rather inexpensive set at the local grocery store and figured it was worth a try.  Yeah, not so much.  So, there I was, about to decorate 60+ cupcakes with no icing bag.  

Insert panic mode here.

So, I improvised, and it worked like a charm!  So, here are instructions on how to make your own icing decorating bag out of a large zip lock bag.

First reinforce the two sides with tape to prevent the seems from splitting as you squeeze out the icing. Do not skip this step.  If you do, make sure you decorate cupcakes with said faulty icing bag out of earshot of any impressionable children.  Or be prepared to have a tongue that hurts from biting it shut. Your choice. 

Trust me.  Your bag will split.  Icing will be everywhere.  Ask me how I know. 

Thankfully I already learned that lesson previously, so no extra panic was added to this particular venture.


If all you need is a round tip, simply snip the corner tip off to size.  

If you're needing a shaped tip, you can try cutting that yourself (ha, ha, ha) or simply snip the corner off (make sure the tape goes all the way to the snipped portion), large enough to insert the coupler.  Attach the pastry tip you've chosen to the pastry coupler and tighten the coupler ring over the tip, just like you would when using a "real" decorating bag.  As an extra precaution to avoid oozing icing and sore tongues, tape the outside of these joints well.


Fill your pastry bag with icing and you're ready to roll!


Monday, 27 August 2012

Oscar the Grouch: Sesame Street Characters Cupcake Tutorial

Welcome back to my four part series: Sesame Street Character Cupcake Tutorial. So far we've covered Elmo and Cookie Monster.  Today?  Oscar the Grouch!

Once again, begin by baking awesome cupcakes using my Hershey's awesome cake/cupcake recipe.  Yes, I am going to beat this to death and mention it in every post.  It's that good. 

For Oscar, you will need....
cupcakes (see above recipe hint)
icing coloured with Wilton's no taste green food colouring
2 white chocolate wafers (aka candy melts) per cupcake
Oreo cookies
chocolate icing
mini chocolate chips or more chocolate icing


Using Wilton's no taste green food colouring, pipe Oscar's fur onto the cupcake using a star tip.

Break apart the Oreos, scrape off (and eat!) the icing, break the Oreos in half and shove the cookie right into Oscar's mouth area.  You want him to look like he's grimacing, not smiling!  I tried the upside down smile-turned-frown, but that just looked weird.  We did this and it worked for me!  Also put the white chocolate wafers (aka candy melts) on for his eyes.  Oscar's eyes are not on the top of his head like Elmo and Cookie Monster, so make sure to put them lower down, and make sure they are not touching each other.  Perfectionist, anyone?!

I wasn't sure I'd have enough chocolate icing left to use for Oscar's unibrow, but Emma came up with a fantastic idea - use upside down mini chocolate chips!  Stagger them close together to get that accurate bushy unibrow.

Pipe chocolate icing for the pupils - centred and not as cross-eyed as Elmo's.

And voila!  Oscar the Grouch!

Stay tuned for the Sesame Street Characters Cupcake Tutorial finale - Big Bird.  By far the most difficult character to create.  Seriously y'all, I almost killed him. (And yes, that was a fake Texas accent.  Y'all know I'm from the Great White North!)

Sunday, 26 August 2012

Cookie Monster: Sesame Street Characters Cupcake Tutorial

Welcome back to my four part series: Sesame Street Character Cupcake Tutorial.  Yesterday featured Elmo and today I bring you - Cookie Monster!

For Cookie Monster you will need....

my Hershey's awesome cake/cupcake recipe
Wilton's blue no taste food colouring
2 white chocolate wafers (aka candy melts) per cupcake
brown icing for pupils
mini chocolate chip cookies

Using Wilton's blue no taste food colouring, pipe your Cookie Monster blue icing onto those delicious cupcakes using a star tip.

Place white chocolate wafers (candy melts) at the top of Cookie Monster's head (nicely done Emma!)


Then shove a mini chocolate chip cookie into Cookie Monster's "mouth area".

Using a round tip, pipe chocolate icing onto the white chocolate wafers, making sure the pupil is at the bottom right "corner" for the left eye, and the top left "corner" for the right eye.

And voila!  Cookie Monster!

Stay tuned for Oscar the Grouch tomorrow!

One thing I may have forgotten to mention.  This food colouring may be no taste, but it's definitely not no stain!

Saturday, 25 August 2012

Elmo: Sesame Street Cupcake Tutorial

Just over a week ago, I made Sesame Street Character Cupcakes (Elmo, Cookie Monster, Oscar and Big Bird) for my youngest nephew's 1st birthday party.  And they turned out amazingly well, if I do say so myself.  (No false modesty here!! Ha ha)

Wanna know how to make 'em?  Then you've come to the right place!

Welcome to my four part series - the Sesame Street Cupcake Tutorial.  I got my inspiration for these cupcakes from these two blogs, but I made several changes.  The biggest thing was that I didn't use fondant for anything.  I've never actually tried it, but I've heard that it doesn't taste great - and, call me crazy, but what good are cupcakes that don't taste great?!

Yeah, my thoughts exactly.  So, no fondant.  But never fear, equally impressive facial features were found that still taste good!

I should also give some credit to my two helpers, Emma and Sophia.  Emma helped me do the facial features for Elmo, Cookie Monster and Oscar, while Sophia was my tutorial photographer - thanks girls!

Today we'll begin with lovable Elmo!

To make Elmo, you will need....
cupcakes
icing coloured with Wilton's red no taste food colouring
2 white chocolate wafers (aka candy melts) per cupcake
Oreo cookies
chocolate icing for pupils
orange peanut M&M's

First step - bake awesome cupcakes using my awesome cake/cupcake recipe.  Ok, it's not actually mine, it's Hershey's, but it's the one I use.  And it's awesome.  Seriously, you need to use it. Best. chocolate. cake. recipe. ever.

Note: I used Wilton no taste food colourings for all these awesomely bright colours - I found them at Walmart and was very impressed with them - particularly that normally oh-so-difficult red.

Pipe red icing on the cupcake using a star tip.  


At first I was disappointed that my icing wasn't a bit more firm, but then decided that it actually looked shaggier and more "realistic" this way!


Now, for the fun part - decorating Elmo's face!  Break apart some Oreo cookies, remove the icing and split them in half.  One Oreo goes a long way - in case math isn't your strong suit, one Oreo makes 4 smiles!  Add two white chocolate wafers (sometimes also called candy melts) which are basically pieces of white chocolate that look like Elmo eyes.


Using a small round tip, pipe chocolate icing on Elmo's eyes - for the most realistic eyes, make sure to pipe the pupils in the centre and slightly cross-eyed.  Then place an orange peanut M&M in between the eyes.  If you have peanut allergies, other options would be orange jelly beans or other orange coloured candies.  And yes, I totally picked through our local grocery store's bulk bin section, only taking the orange ones!


And, voila!  Elmo!


Once you have all your supplies ready to go, Elmo is actually pretty easy.  Try it, you'll see!


Tuesday, 21 February 2012

Mater Birthday Cake Tutorial

Jacob has always loved the Cars movies, so this year I made him a Mater cake for his 4th birthday.  I looked at several different pictures online and took some tips from all of them, and then just did my own thing.  It was actually quite simple and is one of the quicker cakes I've made.

I baked the chocolate cake (recipe to follow in a later post) in two loaf pans.  One was used for the main part of the tow truck.  Then I cut the other one in about 3 equal pieces.  Two of them were stacked (I had to cut it down slightly as one was too short, but two was too tall) to make the cab of the truck, the rest was put in the "leftover bowl".  

Then I iced the whole thing in chocolate icing, and used white icing for the front windows/eyes.

In the meantime,. I had Emma gather up all the supplies for decorating him - I just used whatever we happened to have on hand, I had not planned well ahead of time!  But it worked out great.  This is what we used....

Oreo cookies = wheels and the front thingie
Gum (2 different sizes) = teeth
Peanut M&M's = headlights, taillights, tow truck flashing lights
Chocolate wafer = eyes (could also you M&M's but we didn't have any brown ones)
Mini and Regular sized Kit Kats and Mini Aeros = tow truck equipment
Caramilk = ears/side mirrors

And that's it!


Monday, 28 February 2011

Breadstick Tutorial and Cheese Dip Recipe

In my Whole Wheat Bread tutorial post I mentioned that I make some fabulous breadsticks. I know you're all dying for me to post a breadstick tutorial to back up that claim, so here you go!

I got this recipe from Epicure actually, but made a few changes to it. I originally used this recipe to make a bread bowl and cheese dip that's amazing, and then one day decided to make it as breadsticks, and was hooked! These go great with spaghetti, lasagna or practically any meal really.

Without further ado, here is the breadstick tutorial (recipe at the end)....

Step 1: In your KitchenAid mixer bowl, dissolve yeast in warm water and sugar, and wait a couple minutes for the yeast to bubble.

Step 2: Add in softened (I always just melt it in microwave) butter/margarine, milk, flour, salt and focaccia (optional) spice. Add more or less flour as needed and beat until dough is just slightly sticky to the touch. I prefer this recipe with all white flour, but you could play around with adding in some whole wheat instead if you like.

Note: I love Epicure's focaccia and I use it in this recipe a lot. You could add a herb/garlic spice instead, or pretty much whatever you want. Or you could leave out the spice altogether, and brush on some garlic butter after baking. I've made this recipe with all those variations and I love them all!

Step 3: Spray bowl with Pam, cover and allow dough to rise until doubled, approximately 45 min to 1 hour.

Step 4: Divide into sections - this recipe I usually divide in half, then divide each half into about 12 sections.

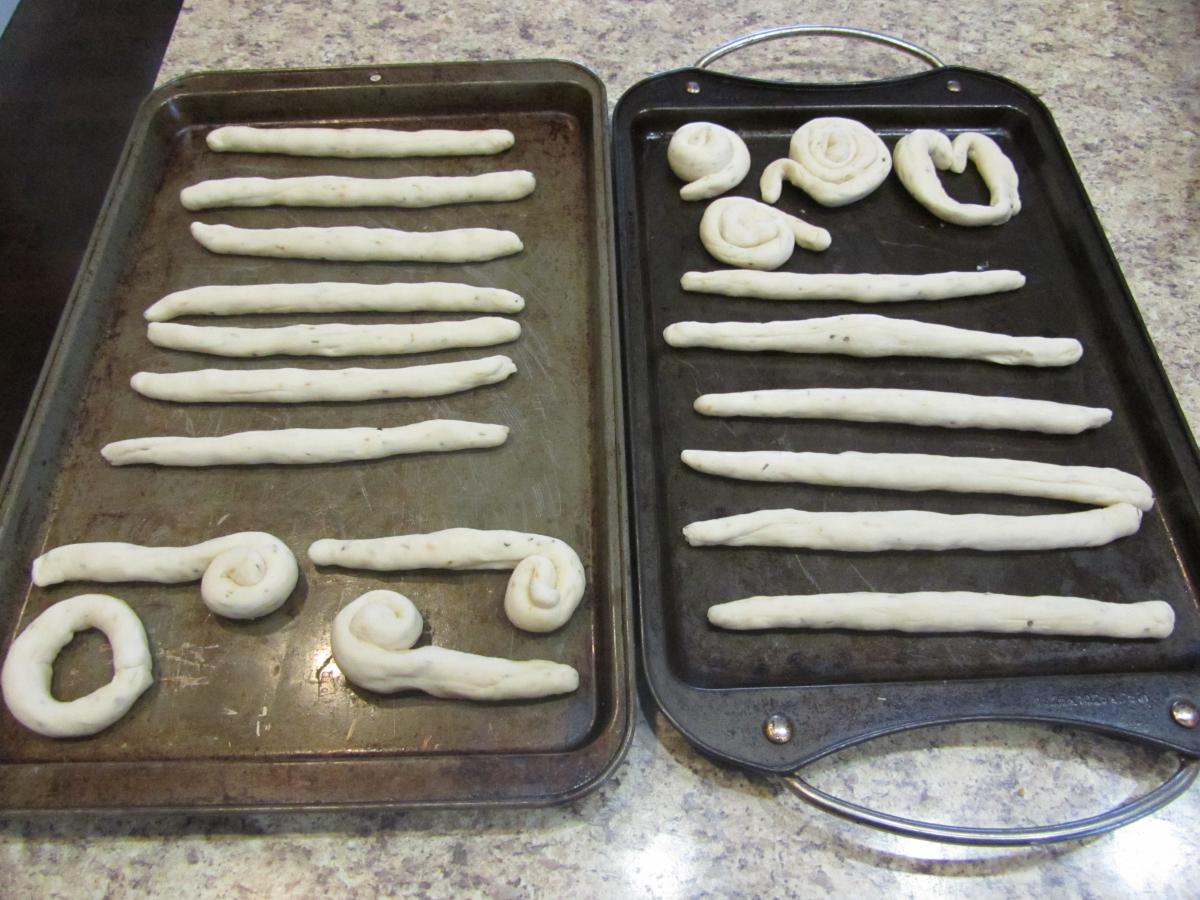
Step 5: Roll each section into a breadstick shape by holding it between your palms and rubbing them back and forth - pretend you're on Survivor and trying to start a fire by rubbing sticks together. That won't likely work in real life, but it will make you some nice breadsticks for this recipe.

Of course, if you have kidlets assisting you, you may wind up with different shaped breadsticks! (snails, lollipops, heart, doughnut)

Step 6: Cover and allow to rise until doubled - when I'm in a hurry (decided a little late in the day to start making these) I've skimped on this step and only let it rise 15-20 mins. But 30 - 45 minutes would be best. Ignore the colour on this picture, not sure what happened there - but you get the idea of the rising action.

Step 7: Bake in 375 preheated oven for 15 - 20 minutes, until golden brown.

Step 8: Brush with melted butter and serve warm. Delicious!!

Because this recipe makes a lot of breadsticks, you can slightly underbake one of the pans (if you think of it, if not, it works just fine fully baked too), cool and freeze in a ziplock bag to quickly and easily pull out and reheat in the oven for another dinner. To reheat, I find that if I stick them in the oven thawed and then turn the oven to 350 - they're ready by the time the oven has finished pre-heating. You could halve the recipe, but it's just as easy to make it as is and then you've got enough for 2 meals - I'm all about simplicity baby!

Like I mentioned before, you can also bake this in a round casserole dish (375 for about 25 minutes) to make a fabulous bread bowl to go alongside some cheese dip as a great appetizer dish.

Here's the recipe....

Breadsticks
Makes approximately 24 breadsticks
2 tsp yeast
3/4 cup warm water
3 tsp sugar
3 tbsp butter/margarine
1/2 cup milk
3 1/2 cups flour
1 tsp salt
2 tsp focaccia (optional)

In a large bowl, dissolve yeast in warm water and sugar. After the yeast has began to bubble, add in butter, milk, flour, salt and any optional spices. Adjust flower as necessary and knead until dough is smooth and just a tad sticky. Place in buttered bowl, cover and let rise until double. Divide dough into approximately 24 sections. Roll dough rapidly between your hands to shape into breadsticks. Place on two pans, cover and let rise for about an hour. Bake at 375 for 15-20 minutes. Or bake in one casserole dish at 375 for 25 minutes to make a bread bowl.

Note: original recipe called for dry milk. If you'd like to go that route, you can substitute 2 tbsp dry milk for the 1/2 cup milk and increase water to 1 1/4 cups (instead of 3/4 cup).

Here's the recipe for the cheese dip....

Cheese Dip
250g package cream cheese
1 cup mayonnaise
1/2 cup mozzarella cheese
1/2 cup cheddar cheese
1 tsp Epicure Lemon Dilly Dip Mix
1 tsp Epicure Cheese Chive & Bacon Dip Mix
1 tsp Epicure 3 Onion Dip Mix

Mix all ingredients together and bake at 350 for 20 minutes in a casserole dish. You could substitute any comparable spices for a similar effect. Serve with bread bowl.

Enjoy!!

LinkWithin

Related Posts with Thumbnails