Showing posts with label Recipes. Show all posts

Monday, 4 March 2013

Best Pizza Crust and Sauce Recipes Ever!


Back in December, 2011 I posted my recipe for pizza and pizza sauce but I had a request for it again, so I thought I'd repost, including a picture I snapped last week (for easy pinning!).   I've also modified the recipe slightly since last posting, so here it goes....


Premium Pizza Crust - adapted from allrecipes.com
1 1/2 tsp yeast (I use quick rising)
1 1/2 cups warm water
3 1/2 cups flour (approx)
1/2 tsp salt


In your KitchenAid bowl, dissolve yeast in the water and add 3 cups of flour along with the salt. You will likely need about 3 1/2 cups flour in total (this is always different depending on the altitude and humidity of where you live). Basically continue adding flour until the dough starts to pull away from the sides of the bowl. If kneeding by hand, until it is smooth and barely sticky. If you add too much flour it gets too heavy - I'd rather err on the side of too little, cause you can always add more when rolling it out later.

If you're using "slow" yeast, allow the dough to rise in a greased bowl, covered with a towel, until doubled in size (about 1 hr).

But if you're using quick rising, you can immediately turn dough out onto a lightly floured surface, divide into two equal pieces and allow to rest for a couple of minutes.

Put pizza pan in the oven and preheat both to at least 450F.

Meanwhile, prepare pizza toppings and roll out dough into the size and shape of your pizza pan.

When oven and pan has finished preheating, carefully remove the pan, spray it with Pam and sprinkle with cornmeal (in my opinion, the perfect way to get a non-sticky yet non-soggy crust), carefully place dough on top of pan, spread with Exquisite Pizza Sauce and desired toppings and sprinkle with paprika (secret from working at a restaurant that served pizza). Bake at 450 (or higher) for about 15 mins (or less, if you baked it higher). Let pizza cool for a couple minutes before cutting and serving.


Exquisite Pizza Sauce - adapted from allrecipes.com
one 6oz can tomato paste
6 fluid oz warm water
1 tsp minced garlic (or 1/4 tsp garlic powder)
1-2 tsp honey to taste (or sugar)
3/4 tsp onion powder
heaping 1/4 tsp oregano
heaping 1/4 tsp marjoram
heaping 1/4 tsp basil
1/4 tsp pepper
1/8 tsp cayenne pepper
1/8 tsp dried red pepper flakes
salt to taste (optional)


Basically, combine all ingredients and allow to sit for about 30 minutes to blend flavours.

You can substitute one 12oz tin of tomato sauce (no salt added) instead of the paste/water if that's what you have on hand.  Whatever's on sale right?!

The original recipe called for 3 tbsp grated Parmesan cheese, and though I do like it that way as well, I didn't taste a noticeable difference when I tried it again without it and it's healthier without it, so I just leave it out.

I didn't have cayenne pepper, so I doubled the red pepper flakes instead.

If you love it as much as we do, you can multiply all the dry ingredients by 8 and put in a jar labelled "Pizza Spice" and simply add 2 tsp to the sauce and honey when every time you make it. Easy as pie - pizza pie that is! ;)

What I often do is make a double batch of the pizza dough, then make 2 large pizzas (one with stuffed crust) and the use the leftovers to make pizza wheels for school lunches.

To make stuffed crust pizza:  it's very easy actually.  Just roll out the dough larger than your pan, place shredded cheese along the edge of pan and fold the extra dough over the cheese to cover it up.  Voila, stuffed crust!  (Picture at the top of this post is stuffed crust personal pan sized pizzas)

To make pizza wheels: simply roll out the dough, spread on the sauce, top with favourite toppings and cheese, roll up and cut like you're making cinnamon buns, allow to rise and then bake at 375 for about 20-25 mins.  Once cooled, you can throw them in the freezer for quick school lunches.

Enjoy!


Friday, 22 February 2013

Watermelon Smoothie

I love watermelon.   And strawberries too, but this is about watermelon. I digress.

Saw this on Facebook, but since I can't figure out how to Pin from Facebook (RawForBeauty), I'm putting in here and then pinning it! :)


I know, right?  Deeeeeelish!

4 cups deseeded cold watermelon
1 tbsp lime juice
1 tbsp raw honey
4 ice cubes
Combine all ingredients in a blender and blend until smooth.

I am so making this this summer!


Sunday, 2 September 2012

From Pinned to Practice #1


Inspired by my sister's From Pinned to Practice series, I've decided to start doing the same thing.  I, too, have fallen for the lure of Pinterest but have also fallen prey to the same tendency as many others have (tell me I'm not the only one!) - and that is to pin and pin and pin, but never actually try all those wonderful ideas!

I have already tried out a few of them, but I will be determined to try more - hopefully at least one a week.

So, here's the first installment of my rendition of From Pinned to Practice!

And, surprise, surprise - it's a recipe.

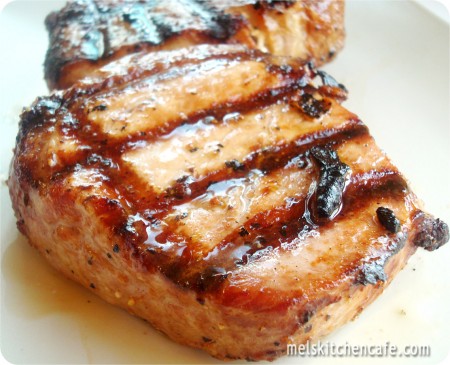
Grilled Pork Chops by melskitchencafe.com


INGREDIENTS:
4 boneless pork loin chops
1/4 cup olive oil
2 1/2 tablespoons soy sauce
1 teaspoon steak seasoning (such as Montreal Steak Seasoning or make your own*)

DIRECTIONS:
Mix olive oil, soy sauce and steak seasoning ingredients in a small bowl and pour into a one-gallon resealable plastic bag. Add the pork chops and set the bag in a baking dish in a way that the pork chops get a healthy dose of the marinade (it may be advantageous to flip the bag over halfway through the marinating time). Marinate in the refrigerator for 3-8 hours (no more than 8). Heat the grill to medium and grill the chops 6-8 minutes per side (depending on how thick they are) until they are no longer pink in the center. Remove the chops from the grill and tent them with foil and allow them to rest for 5-7 minutes. Slice the chops in 1/4 to 3/8 inch slices across the grain and serve.


I tried the recipe exactly as is, and LOVED it! (Well, Nathan did the grilling - he's amazing at it).

Top picture is the original pin, bottom picture is our reality.  


Happy pinning and practicing!


Thursday, 15 December 2011

Best Homemade Pizza Ever!

I've recently found the perfect combination of the best pizza crust recipe and the best pizza sauce recipe to create the best homemade pizza ever - if I do say so myself. ;)

And, in the spirit of Christmas, I'm going to share it with y'all!

Finding the perfect crust recipe to impress my husband was the most difficult part of all. I would think I'd found the winning one, and it just wouldn't quite cut it. But this time, I nailed it! The instructions will be using a KitchenAid mixer, but you can obviously also kneed it by hand.

Premium Pizza Crust - adapted from allrecipes.com
1 1/2 tsp yeast (I use quick rising)
1 1/2 cups warm water
3 1/2 cups flour (approx)
1/2 tsp salt

In your KitchenAid bowl, dissolve yeast in the water and add 3 cups of flour along with the salt. You will likely need about 3 1/2 cups flour in total (this is always different depending on the altitude and humidity of where you live). Basically continue adding flour until the dough starts to pull away from the sides of the bowl. If kneeding by hand, until it is smooth and barely sticky. If you add too much flour it gets too heavy - I'd rather err on the side of too little, cause you can always add more when rolling it out later.

Allow the dough to rise in a greased bowl, covered with a towel, until doubled in size (about 1 hr).

Turn dough out onto a lightly floured surface, divide into two equal pieces and allow to rest for a couple of minutes.

Put pizza pan in the oven and preheat both to at least 450F.

Meanwhile, prepare pizza toppings and roll out dough into the size and shape of your pizza pan.

When oven and pan has finished preheating, carefully remove the pan, spray it with Pam and sprinkle with cornmeal (in my opinion, the perfect way to get a non-sticky yet non-soggy crust), carefully place dough on top of pan, spread with Exquisite Pizza Sauce and desired toppings and sprinkle with paprika (secret from working at a restaurant the served pizza). Bake at 450 (or higher) for about 15 mins (or less, if you baked it higher). Let pizza cool for a couple minutes before cutting and serving.


Exquisite Pizza Sauce - adapted from allrecipes.com
one 6oz can tomato paste
6 fluid oz warm water
1 tsp minced garlic (or 1/4 tsp garlic powder)
1 tbsp honey
3/4 tsp onion powder
1/4 tsp oregano
1/4 tsp marjoram
1/4 tsp basil
1/4 tsp pepper
1/8 tsp cayenne pepper
1/8 tsp dried red pepper flakes
salt to taste (optional)

Basically, combine all ingredients and allow to sit for about 30 minutes to blend flavours.

You can substitute one tin of tomato sauce (no salt added) instead of the paste/water if that's what you have onhand.

The original recipe called for 3 tbsp grated Parmesan cheese, and though I do like it that way as well, I didn't taste a noticeable difference when I tried it again without it and it's healthier without it, so I just leave it out.

I didn't have cayenne pepper, so I doubled the red pepper flakes instead. I also increased the Italian spices just a bit. I also blended everything with a hand blender because I like it smooth, and to crush up the dried pepper flakes more.

If you love it as much as we do, you can multiply all the dry ingredients by 8 and put in a jar labelled "Pizza Spice" and simply add 2 tsp to the sauce and honey when every time you make it. Easy as pie - pizza pie that is! ;)

Enjoy!

Monday, 28 February 2011

Breadstick Tutorial and Cheese Dip Recipe

In my Whole Wheat Bread tutorial post I mentioned that I make some fabulous breadsticks. I know you're all dying for me to post a breadstick tutorial to back up that claim, so here you go!

I got this recipe from Epicure actually, but made a few changes to it. I originally used this recipe to make a bread bowl and cheese dip that's amazing, and then one day decided to make it as breadsticks, and was hooked! These go great with spaghetti, lasagna or practically any meal really.

Without further ado, here is the breadstick tutorial (recipe at the end)....

Step 1: In your KitchenAid mixer bowl, dissolve yeast in warm water and sugar, and wait a couple minutes for the yeast to bubble.

Step 2: Add in softened (I always just melt it in microwave) butter/margarine, milk, flour, salt and focaccia (optional) spice. Add more or less flour as needed and beat until dough is just slightly sticky to the touch. I prefer this recipe with all white flour, but you could play around with adding in some whole wheat instead if you like.

Note: I love Epicure's focaccia and I use it in this recipe a lot. You could add a herb/garlic spice instead, or pretty much whatever you want. Or you could leave out the spice altogether, and brush on some garlic butter after baking. I've made this recipe with all those variations and I love them all!

Step 3: Spray bowl with Pam, cover and allow dough to rise until doubled, approximately 45 min to 1 hour.

Step 4: Divide into sections - this recipe I usually divide in half, then divide each half into about 12 sections.

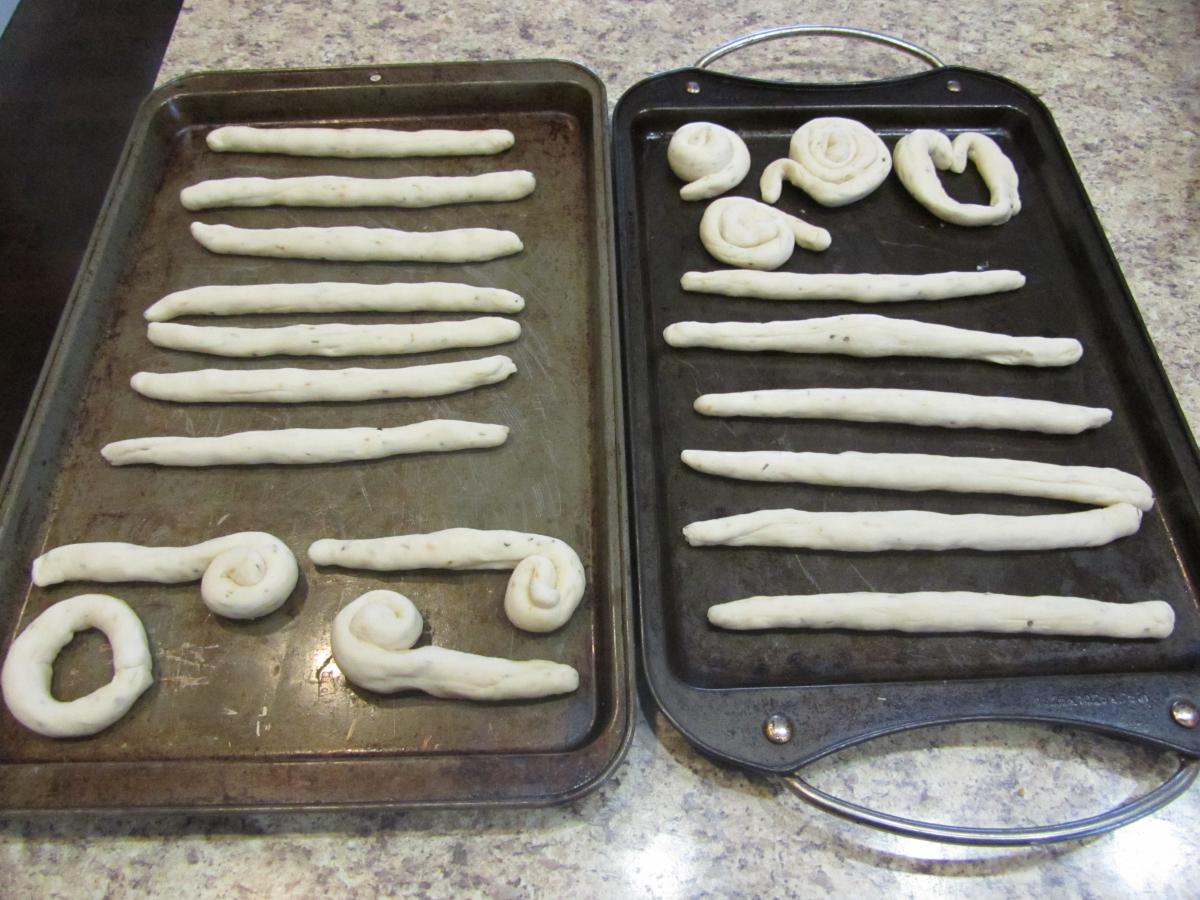
Step 5: Roll each section into a breadstick shape by holding it between your palms and rubbing them back and forth - pretend you're on Survivor and trying to start a fire by rubbing sticks together. That won't likely work in real life, but it will make you some nice breadsticks for this recipe.

Of course, if you have kidlets assisting you, you may wind up with different shaped breadsticks! (snails, lollipops, heart, doughnut)

Step 6: Cover and allow to rise until doubled - when I'm in a hurry (decided a little late in the day to start making these) I've skimped on this step and only let it rise 15-20 mins. But 30 - 45 minutes would be best. Ignore the colour on this picture, not sure what happened there - but you get the idea of the rising action.

Step 7: Bake in 375 preheated oven for 15 - 20 minutes, until golden brown.

Step 8: Brush with melted butter and serve warm. Delicious!!

Because this recipe makes a lot of breadsticks, you can slightly underbake one of the pans (if you think of it, if not, it works just fine fully baked too), cool and freeze in a ziplock bag to quickly and easily pull out and reheat in the oven for another dinner. To reheat, I find that if I stick them in the oven thawed and then turn the oven to 350 - they're ready by the time the oven has finished pre-heating. You could halve the recipe, but it's just as easy to make it as is and then you've got enough for 2 meals - I'm all about simplicity baby!

Like I mentioned before, you can also bake this in a round casserole dish (375 for about 25 minutes) to make a fabulous bread bowl to go alongside some cheese dip as a great appetizer dish.

Here's the recipe....

Breadsticks
Makes approximately 24 breadsticks
2 tsp yeast
3/4 cup warm water
3 tsp sugar
3 tbsp butter/margarine
1/2 cup milk
3 1/2 cups flour
1 tsp salt
2 tsp focaccia (optional)

In a large bowl, dissolve yeast in warm water and sugar. After the yeast has began to bubble, add in butter, milk, flour, salt and any optional spices. Adjust flower as necessary and knead until dough is smooth and just a tad sticky. Place in buttered bowl, cover and let rise until double. Divide dough into approximately 24 sections. Roll dough rapidly between your hands to shape into breadsticks. Place on two pans, cover and let rise for about an hour. Bake at 375 for 15-20 minutes. Or bake in one casserole dish at 375 for 25 minutes to make a bread bowl.

Note: original recipe called for dry milk. If you'd like to go that route, you can substitute 2 tbsp dry milk for the 1/2 cup milk and increase water to 1 1/4 cups (instead of 3/4 cup).

Here's the recipe for the cheese dip....

Cheese Dip
250g package cream cheese
1 cup mayonnaise
1/2 cup mozzarella cheese
1/2 cup cheddar cheese
1 tsp Epicure Lemon Dilly Dip Mix
1 tsp Epicure Cheese Chive & Bacon Dip Mix
1 tsp Epicure 3 Onion Dip Mix

Mix all ingredients together and bake at 350 for 20 minutes in a casserole dish. You could substitute any comparable spices for a similar effect. Serve with bread bowl.

Enjoy!!

Friday, 18 February 2011

Homemade Whole Wheat Bread Tutorial

I certainly do not claim to be an expert breadmaker. I've been making breadsticks for a long while now (and they're rather delicious if I do say so myself), but I hadn't had much luck with making bread, until now! I have found a no-fail recipe for whole wheat bread that is not dense!! That was the biggest drawback to all the homemade bread recipes I'd tried before, they were too dense.

This is the one and only bread recipe I use (why mess with perfection right?!). I originally found this recipe at Food.com but I modified it slightly. (Full recipe at the bottom of this post).

So, with no further ado, here is my breadmaking tutorial.

Step 1: Dissolve yeast in warm water (I just dissolve it in my measuring cup - why dirty more dishes than you have to right?)
Step 2: In your awesome KitchenAid mixer bowl, combine margarine, brown sugar & water (original recipe called for molasses, but I didn't have any so I substituted brown sugar & water as per Google - LOVE Google), honey and salt and mix well.

Step 3: Gradually stir in yeast mixture.

Step 4: Add in flours and let the KitchenAid do all the work for you!!

Step 5: Add in more flour if dough is too sticky. A little sticky is ok (if you add too much flour the bread will be dense and, as we've already discussed, we don't like dense bread around here), but not too sticky.

Step 6: Butter (or Pam) the bowl, cover and let rise until double (about 45 min - 1 hr)

Step 7: Divide dough into 2 parts using a knife (do not rip the dough - don't ask me why, ask Google). I use a ulu knife which is the coolest kitchen utensil ever made - I used it every day (perfect for cutting up food for kids superfast!)

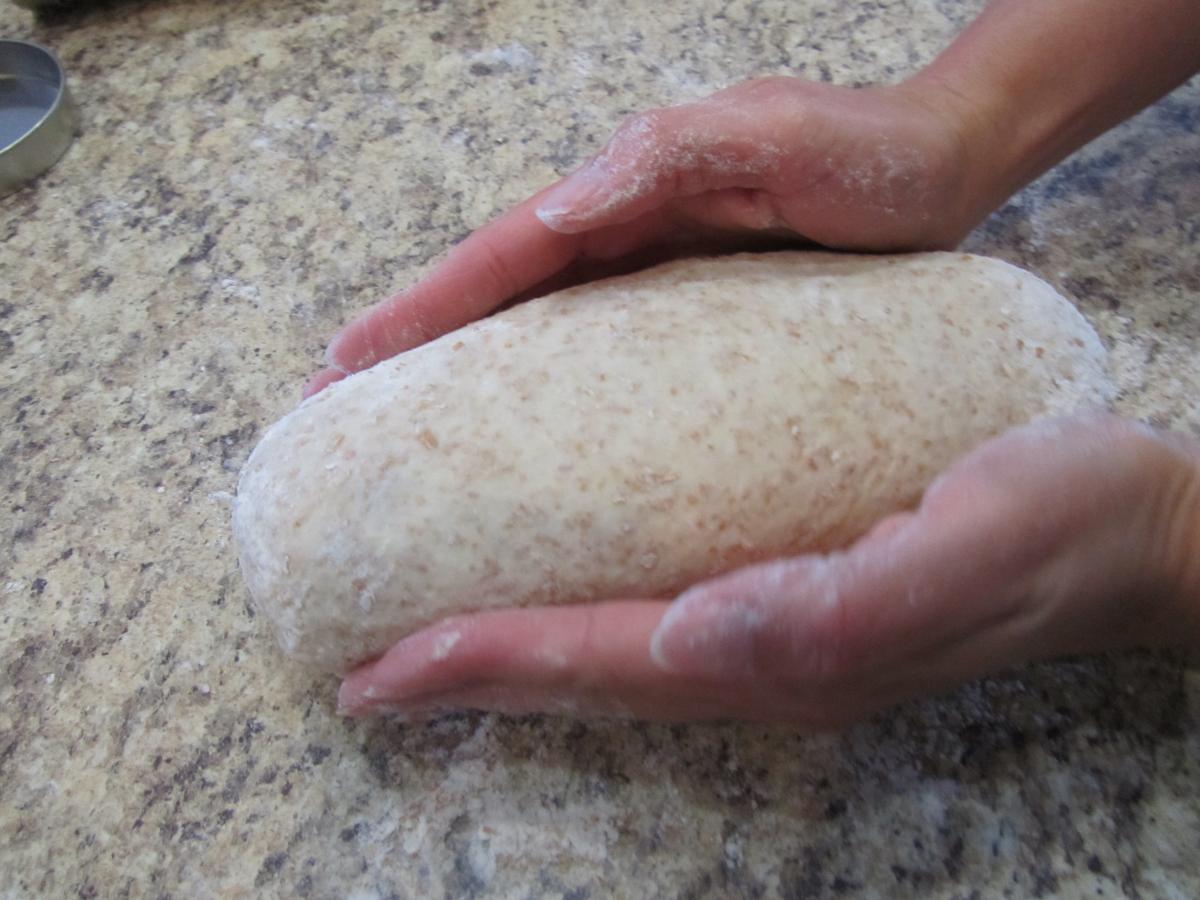
Step 8: Shape dough into loaves by kneading and smoothing into the correct shape.

Step 9: Slam the loaf onto the counter hard, in order to remove any air pockets in the dough. Place in greased pans, cover and let rise for about an hour. This recipe makes 2 loaves, but I always also steal a bit of the dough to bake another small loaf in a flower shaped tube pan. When cut, it makes the cutest flower shaped bread perfect for sandwiches for the girls lunches - they love it! I think I bought them from Everyday Style (home party), but you can also get a set of 3 (heart, star, flower) on Amazon here.

Step 10: Bake at 375 for 35 - 40 mins (it only takes 30 minutes in mine for the regular loaves and 35 for the flower pan loaf)
Step 11: Turn out immediately onto the counter to cool. I like to cool them on it's side so the bottom doesn't get soggy and the top doesn't get flattened.


Step 12: If you can, wait till they're cooled before cutting. But we all know how yummy still warm bread is from the oven, so go ahead and slice a piece off and enjoy slathered with some butter - yummy!Note: If your oven is not busy doing something else, you can preheat it to 170F, then turn it off, and put the dough inside the oven to rise in a nice warm environment - a bit faster than just on the counter as well.

Wholesome Homemade Honey Whole Wheat Bread
Makes 2 loaves
2 1/4 tsp yeast
2 cups water
1/4 cup butter or margarine
2 tbsp molasses (or 1 1/2 tbsp brown sugar + 1/2 tbsp water)
1/4 cup honey
1 tsp salt (I use 1/2 tsp to reduce sodium content and it tastes just fine)
4 cups whole wheat flour
2 cups white flour

Dissolve yeast in warm water. In a large bowl, combine butter, molasses (or brown sugar/water), honey and salt and mix well. Add yeast mixture and then gradually add in flours. Knead until smooth and not sticky. Place in buttered bowl, cover and let rise until double. Divide dough into 2 parts using a knife. Knead and shape into loaves. Slam the dough hard onto the counter to remove any air pockets. Place in greased pans, cover and let rise for about an hour. Bake at 375 for 30 - 35 minutes.

Enjoy!!


My friend Kathryn has a great post with a lot of bread making tips here.

Friday, 7 January 2011

Homemade Easy Bake Oven Mixes and Recipes

With 2011's Goal#3 in mind (to be a more deliberate mother), I finally caved.

Olivia has been begging for an Easy Bake oven for years. Literally 2 years. And she's 5. So, yeah, almost half her life.

And until this Christmas I had steadfastly refused. Why? Because I didn't want to have to bake with her. I didn't want the mess, I didn't want to pay money for those silly little mixes, I didn't want to be bothered.

Yikes, that sounds even worse when I type it out.

I don't like to do crafts with the kids because I know I would go all perfectionist on them and freak out if their handmade bracelets didn't have an exact pattern, if they couldn't do it the way I would do it. Because a 33 yr old and a 5 yr should be able to make the same calibre bracelet. I know, I get the ludicrousy. (Is that even a word?!)

OK, selfishness acknowledged.

Technically, Olivia had begged for the Easy Bake cupcake maker - but all the reviews I read on it said it was a piece of junk, so I convinced her that the oven was what she wanted, and I finally gave one of her Grandmas the OK to get it for her for Christmas this year (God bless all Grandmas who wait for permission for these types of gifts!!). And, oh, let me tell you, was she ever in her glory - it was as if the heavens had opened up!

Now, my old self may would have been tempted to let that Easy Bake oven sit on the shelf hidden away, giving the "Later" or "Another day" answer a million times over (yes, this is Olivia - it would've been a million times!). Or I would've just made Emma do it with her. Yes, there are definite advantages of having older kids around! ;)

But my new self, my 2011 self with Goal#3 in mind, did not do that.

Oh, no!

In fact, the very next day after she got that gift, on a Sunday afternoon no less (sacred napping time around these parts), she asked to "do the Easy Bake oven" and I said "Yes!". And so we made cake with icing (both mixes included in the original box).

Psst - you know what?

I had fun.

What was that Tammy? We couldn't hear you.

OK, OK, I had fun!

And Olivia? Well she had an absolute blast!

Sidebar: Technically that was in 2010 but I already had my 2011 goals in mind at the time ;)

Then we left for Alberta to visit family. The very next day after we returned, guess who was asking to do the Easy Bake oven again? Yup, Olivia! And guess who said yes? Yes, 2011 Tammy! So, we made the cookies from the mix that came with the box. Olivia even let Sophia help! They each got to make 3 cookies in their pan, and we even melted chocolate chips and butterscotch chips in the oven warmers to put on top of the cookies.

Both times it took much less time and mess than I thought and resulted in happy children - why have I not done this earlier?

So, now that all the included mixes had run out, I went to my trusty old friend Google to find some homemade Easy Bake oven mixes because my cheap Mennonite thrifty side would not allow me to spend $ on those mixes. Plus, they can't exactly be healthy if all you have to do to get cake or cookies is add water to powder (see Goal#4 - I'm getting a 2 for 1 deal here!)

And Google did not disappoint (though I should've searched with the Swagbucks tool bar to earn Swagbucks, but I digress).

Turns out there are oodles of things you can bake in those Easy Bake ovens and oodles of recipes to choose from. This post has pretty close to 200 (!!) recipes split into categories and labeled as easy, intermediate or advanced. Everything from cakes, brownies, cookies and bars to biscuits and scones, to pizzas and bagels - your own creativity is the limit after viewing these recipes!

So, I picked the Baked Cinnamon Apple recipe because, after quickly clicking on a couple recipes, it used ingredients I had on hand! ;) Olivia loved them! Although I think she actually liked eating the extra/leftover ones before they had cooked (one large apple does not fit into 2 of those little pans!) better than the baked ones afterward. She really wanted to make the brownies, so I picked up some chocolate syrup so we can try those next time!

Here are the recipes (after all, that's what my post title promised you - took me long enough to get around to it, I know!)....

Baked Cinnamon Apples
1 large apple
1/4 teaspoon butter
1/8 tsp cinnamon
1 tablespoon sugar

Wash a large apple, remove center core.
Slice across apples to make 1/2" thick rings.
Grease pan with butter.
Place apple slices in pan.
Sprinkle lightly with cinnamon then sugar.
Top with butter.
Bake in Easy-Bake Oven about 20 minutes.


Brownie Mix
2-1/2 tablespoons sugar
2-1/2 tablespoons flour
1 teaspoon oil
1/8 teaspoon vanilla extract
4 teaspoons chocolate syrup

Blend all ingredients until the batter is smooth.
Pour batter into greased and floured toy cake pan.
Bake as directed in child oven (I think it's preheat for 15 and bake for 10)


I also found a recipe on Allrecipes.com for a larger cake mix, good for 10 batches, to save time - and create your own little mix package!

Easy Bake Oven Cake Mix
1 cup white sugar
1 1/2 cups flour
1 tsp baking soda
1/2 tsp salt
1 tsp unsweetened lemonade drink mix
1/3 cup shortening

In a medium bowl, combine sugar, flour, baking soda, salt, and lemonade drink mix and stir to blend.
Cut in shortening with a fork or pastry blender until mixture resembles corn meal.

Spoon about 1/3 cup mixture into 10 small containers or sealable plastic bags.
Label and store in cool, dry place. Use within 12 weeks.


Preheat Easy Bake oven for 15 mins.
Grease and flour a 4 inch miniature cake pan.

Empty the contents of one bag cake mix into a small bowl.
Using a fork, mix with 4 teaspoons water until smooth.

Bake according to manufacturer's instructions (I think 10 mins)


In fact - according to this recipe, all you need is regular commercial cake mix (3 tbsp any flavour) mixed with 1 tbsp milk) and voila - let them eat cake! How easy is that?!

Easy, but not as healthy (processed and all that!). So, here's another homemade version...

Easy Bake Oven Chocolate Cake
4 tsp flour
2 tsp cocoa
1 tbsp sugar
1/8 tsp baking powder
1 dash salt
1/8 tsp vanilla
4 tsp water
2 tsp vegetable oil

It would be pretty easy to multiply that by 10, omitting the wet ingredients, in order to make your own mix to have on hand, ready to just add water and oil at baking time!

Recipezaar (now Food.com) has a whole ton of recipes as well - you can check them out here - including omelettes!

Easy Bake oven Omelet
1 egg
4 tsp shredded cheddar cheese
1/4 tsp oregano (or spice of your choice)
1 pinch salt
1 pinch pepper
cooking spray

Preheat the Easy Bake Oven for 15 mins.
Spray 2 Easy Bake Oven pans with cooking spray.
Scramble the egg in a bowl.
Divide the egg between the 2 pans.
Sprinkle with oregano, salt and pepper.
Sprinkle 2 tsp of the cheese on top of each egg.
Bake for 15 minutes.


One thing to keep in mind - since the Easy Bake Oven works by simply using a light bulb, you have to be careful when baking meats that you only use meats that need to be warmed, not cooked through!

OK, I was going to be done, but then I found this ....

Easy Bake Oven Deep Dish Pizza
2 tbsp flour
1/8 tsp baking powder
1 dash salt
1 tsp margarine
2 1/4 tsp milk
1 tbsp pizza sauce
1 1/2 tbsp shredded mozzarella cheese

Preheat Easy Bake Oven 15 minutes.
Stir together flour, baking powder, salt and margarine until dough looks like medium-sized crumbs.
Slowly add milk while stirring.
Shape dough into a ball and place into a greased pan.
Use your fingers to pat the dough evenly over the bottom of the pan, then up the sides.
Pour the sauce evenly over the dough, then sprinkle with the cheese.
Bake 20 mins.

You could even add a slice of pepperoni or veggies or some other meats that only need to be warmed up not truly cooked through.

Honestly, I'm actually getting a little excited to try some of these! Apparently you can teach an old dog new tricks. ;) And, I only thought of it now, I totally should've taken a picture!

Goal#3 is officially underway.

Tuesday, 19 October 2010

Waffles Extraordinaire!

Our kids LOVE waffles.

In an effort to make eating waffles at least somewhat healthier, we have stopped buying waffles at Costco and I have started making them.

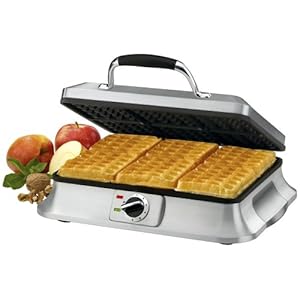
To assist me in the process of making waffles for 4 kids, I purchased this awesome 6-slice waffle maker by Cuisinart. LOVE it! So, I mix up a big batch of waffles (don't worry, recipe's coming!) fresh one day and then I freeze the rest of them - homemade healthy Eggo waffles just waiting for the toaster! Makes for a super quick breakfast too. Now, if there was only a way to make syrup healthier....


Best Waffle Recipe Ever
6 eggs
3 cups flour
2 cups whole wheat flour
1 cup oatmeal
1 cup vegetable oil
1/2 cup applesauce (I use one container of the Motts applesauce we always have on hand)
5 1/4 cups milk
3 tbsp white sugar
4 tbsp baking powder
3/4 tsp salt
3 tsp vanilla
1-2 tsp cinnamon (secret ingredient!!)

Preheat waffle iron.
Beat eggs in KitchenAid food mixer (LOVE it!) until fluffy. Beat in remaining ingredients, just until smooth.
Spray preheated waffle iron with non-stick cooking spray. (For my waffle maker) Pour 1 1/4 cup of batter evenly onto hot waffle iron, going close to the edges). Cook until golden brown. Serve hot.
Freeze leftovers in a single layer on a baking sheet (I use tinfoil in between layers so I only need to find room for one baking sheet in the freezer), then transfer to ziplock bag (or other container) for a super easy breakfast option (simply pop in the toaster, just like Eggo waffles).

Enjoy!!

*Feel free to play around with the flours and the oil/applesauce to make it healthier. I made it today with 2 cups white flour, 3 cups ww, 1 cup oatmeal, 1/2 cup oil, 1 cup applesauce and couldn't notice a taste difference - but there's definitely a health difference!

Edited to add: Here's the recipe for the white waffle sauce mentioned in the comments - my personal favourite waffle topping (combined with fresh strawberries of course - hmmmmmmm!)

Thursday, 14 October 2010

Homemade Microwave Popcorn

My friend Sandy posted a very delicious sounding recipe on Facebook today - homemade microwave popcorn!

I haven't tried it yet, but it certainly promises to be amazing. The kids often have microwave popcorn as nightsnack when babysitters are over, but this is easy enough for me to teach the kids how to do it. Super cheap and definitely healthier than the bought variety. Thanks Sandy!!

Homemade Microwave Popcorn
1/4 to 1/3 cup popcorn kernels (unpopped, obviously)
1 - 2 tbsp oil
paper lunch bag
spices or flavourings to taste

Put popcorn kernels and oil in the paper lunch bag. Fold the open end of the bag 2 or 3 times and tape shut (or secure with tooth pick). Microwave for approximately 3 mins (popcorn setting on microwave would likely work). Open, season to taste and enjoy! You could also experiment with different types of oil - canola oil, coconut oil, olive oil. Hmmmmmm. The possibilities are endless!!

Wednesday, 7 April 2010

How to make crispy sweet potato fries

Those of you who know me, know of my major aversion to potatoes. I don't eat them ever, not even to be polite! I don't even like fries, unless they're skinny and crispy and don't taste at all like potatoes :)

But I've tried sweet potatoes and I kinda like them. I really like the sweet potato fries I've had in the restaurants, so I decided to try to make them at home. Baked sweet potatoes - pretty healthy snack!

So, I tried. And failed. Miserably. They were like limp shoelaces of mush. Yeah, my thoughts exactly.

Thus began my internet search for tips on how to make crispy sweet potato fries.

And.....success!!

So, in case there are other sweet potato fry lovers out there, wanting to bake their own healthier versions at home, here is the recipe...

Crispy Baked Sweet Potato Fries
3-4 small sweet potatoes (orange flesh)
2 egg whites
2-3 Tbsp all purpose flour
1-2 Tbsp of spices (Any combination of curry, cumin, chili powder, garlic powder, seasoning salt, taco seasoning, etc.)

1) Put a cookie sheet (with edges) into the oven and preheat it to 400F.
2) You can leave the peel on the potatoes for even more healthy goodness (don't forget to wash them!), or you can peel it - up to you. Cut sweet potatoes in half (ok, I totally should've taken pictures - maybe I'll do that soon and add them in later). Stand them up and cut into 1/4" semi-circles, then cut them into 1/4" fries.
3) Soak cut fries in water for 10 min - 8 hrs (I did it for 1 hr). You can change the water in between if you like. This process sucks some of the starch out of the potatoes, one of the causes of the mushiness factor. Drain water and rinse fries (again, rinsing off starch). Dry fries thoroughly - pat dry or air dry.
4) In a large bowl, whisk egg whites until frothy. Toss fries in egg whites. Add flour 1 tbsp at a time and toss to coat. Add spices and toss to coat.
5) Remove hot pan from the oven, spray with Pam (or whatever oil you want to use) and spread coated fries onto pan. Do not allow fries to touch.
6) Put the pan on one of the lowest racks in the oven and bake for 30-40 mins, turning after about 20 mins. Open the oven door at least 2 times during baking to allow the moisture from the baking potatoes to be released. Check on them every couple minutes after the 30 min mark to make sure they don't burn.
7) Remove and enjoy with your favourite dipping accompaniment.

Delicious!!! Now, I just need to experiment with different spices to find out what I like best. Today I used chili powder, but I used too little (I didn't use 1 tbsp as I was scared of getting them too spicy). I've heard taco seasoning is supposed to be great. I've also heard a combo of garlic and cinnamon is supposed to be good. I know, sounded weird to me too.

Unfortunately, I seem to be the only one in my family that enjoys these delicious fries. That's ok - my own personal snack! Now I just need to figure out how to store a half used sweet potato.

Tuesday, 21 July 2009

Blog Hop - Favourite Recipe

I have lots of favourite recipes, but here's a really simple and delicious brownie recipe....

Decadent Brownies
1/2 cup butter or margarine
1/4 cup cocoa
2 eggs
1 cup sugar
3/4 cup flour
1/8 tsp salt

Melt butter in the microwave and stir in cocoa. In a medium bowl, beat eggs, then add sugar, flour, salt and cocoa mixture - stir all together. Scrape batter into greased 8x8 pan and bake at 350 for 25 - 30 minutes.

Icing
1 1/3 cup icing sugar
1/3 cup cocoa
3 tbsp softened butter or margarine
1 1/2 tbsp hot prepared coffee or water

Beat all ingredients together, adding more water if mixture is too firm to spread easily or more icing sugar if too soft. Spread over warm brownies. Allow to set before cutting.


Friday I will be hosting a Mom to Mom post where we share ideas on how to encourage our children's relationship with Jesus. All participants will be eligible for a giveaway. Please join me Friday!


MckLinky Blog Hop

Friday, 3 July 2009

I feel good - da na na na na na na!

Having recently felt convicted about doing a better job keeping my house in order consistently, I have to say that I had a very productive day today! Even though I slept in and only got up just before 9 o'clock!! Ahhh, summer holidays! I love me my beauty sleep.

So, what did I all accomplish today?

I obviously fed (and cleaned up after) all my MSC - Many Small Children (awesome acronym stolen from MckMama)

I exercised - as in dripping-with-sweat exercised.

I baked about 7 dozen oatmeal chocolate chip cookies (see recipe below) - 5 dozen of which are for this week's day camp at our church. I even let my kids help!

I got at least 1 and a 1/2 hrs of bookwork done while my MSC played outside or napped (Jacob).

I read my Bible reading plan for today (and only had to read today's as I was all caught up!)

I read devotions with the girls on the deck in the afternoon (more details on this to come next week!)

I played with the girls outside. Even though she finally learned how to pump, Olivia could still be pushed on the swing all day long I think.

I set up the sprinkler under the trampoline AND the slip n' slide for my MSC and their friends to play in.

I had 3 of my MSC's friends over for lunch - at the last minute!

I went for a walk with all my MSC, meeting my MIL to bring Nathan and his dad some cold drinks on this fairly hot day.
Made a delicious supper - bbq'd chicken breasts, whole wheat rice, potatoes (for Nathan and Emma - I do NOT eat potatoes), corn and garlic bread.

I made Sophia and Olivia banana splits (but did NOT have any myself - woohoo!) while Jacob was shopping with my wonderful husband, and Emma was at her first pyjama party(not sleepover!) with her friend. OK, I do admit to having at least 3 strawberries (we used strawberries instead of cherries) dipped in whipping cream. OK, ok, I also ate 3 (yes three!) of those delicious cookies fresh out of the oven - well, 2 right away, and then one later warmed up in the microwave. Just keeping it real. Cause I'm all about honesty. Even it when it works against me and my image. :)

I read Sophia & Olivia a Bible story and prayed with them before bedtime (while the other 2 were still gone - it's not like they were being grounded from Bible storytime or anything!).

And I blogged....twice today!

And then there was obviously the just normal, everyday stuff like changing diapers, sweeping floors (after every meal - due to our lovely dark hardwood floors - ok, our MSC have something to do with this as well), swiping bathrooms, washing feet, settling arguments - well, you know!

So - mission accomplished for today. And I feel grrrrrreat!

OK - here's the recipe as promised. This is the fake Neiman Marcus oatmeal chocolate chip cookies recipe. Neiman Marcus actually developed a chocolate chip cookie recipe in response to this hoax - but I'm actually using the hoax recipe itself cause it's really good!

2 cups butter
2 cups sugar
2 cups brown sugar
4 eggs
2 tsp vanilla
5 cups blended oatmeal (yup, put 5 cups of oatmeal in a blender and blend away!)
4 cups flour
2 tsp baking powder
2 tsp baking soda
1 tsp salt
24oz chocolate chips
3 cups chopped nuts (optional)

The recipe also calls for 8oz Hershey bar grated - but I don't usually do this, normally because I don't stock that in my pantry! I have sometimes added some chocolate chips to the oatmeal while blending, but I didn't today. I needed to save some to make Mocha Banana Chocolate Chips Muffins (maybe tomorrow's project?) - I've got ripening bananas going on in a big way right now.

Beat together butter, sugars, eggs and vanilla. Add oatmeal, flour, bp, bs, salt and mix. Add chocolate chips and nuts (we don't do nuts). Love me my KitchenAid mixer!!

Bake at 375 for about 10 minutes. Makes about 7 dozen cookies using my medium Pampered Chef scoop.

Tuesday, 9 June 2009

Waffle white sauce recipe

As requested, here is the recipe for waffle white sauce. This is excellent served over waffles or pancakes with virtually any type of fruit - I prefer strawberries!

2 eggs
3/4 cup sugar
1 tsp vanilla
1 1/2 tbsp butter
1 1/2 tbsp cornstarch
2 cups milk

Beat the eggs and sugar, stir in vanilla. Turn on heat to medium, add butter and stir till butter melts. In a measuring cup (or the Tupperware Quick Shake - perfect for no lumps for all gravies!!) whisk cornstarch into milk. Whisk into egg mixture. Heat till boiling so it thickens, stirring continuously (or the milk burns onto bottom of pan). Serve warm over waffles and fruit. Hmmm, delicious!

Monday, 25 May 2009

Menu Monday and BBQ Chicken recipe

Menu Monday returns! I know, you were all waiting for it with baited breath.

I'm not necessarily going to post the meal for each day - but rather I'll pick 6 meals and then I can decide throughout the week what works best. For ex - if it is raining on bbq day, I may go easy on Nathan and switch things up.

Spaghetti and meatsauce, corn, homemade foccacia bread - today!
BBQ chicken
BBQ sausage burgers
tacos/taco salad
chicken quesadillas
homemade pizza (and pizza wheels for future lunches)

Nathan makes the best bbq chicken I've ever had! We got the recipe from Kraft Canada and I will generously share some of his grilling secrets with you my loyal readers.

First, choose a good quality brand of chicken. Next follow the recipe below!

From the Kraft Canada magazine/website:

Ingredients
4 boneless, skinless chicken breast halves (1 lb.)
1/3 cup Kraft Creamy Caesar Dressing
1/4 cup Bull's-Eye Chicken and Rib Renegade Barbecue Sauce

1. Place chicken on cutting board and use kitchen mallet, rolling pin or small sauce pot to slightly flatten any thick ends. This step ensures even width and even cooking. (FYI - we skip this step 99% of the time)
2. Pour dressing into a large resealable plastic bag.
3. Place chicken in bag with dressing. Seal bag and refrigerate 30 minutes to 1 hour to marinate.
4. Preheat barbecue to medium heat. Remove chicken from plastic bag and discard marinade. Place chicken on barbecue; cover with lid. Grill 6 to 8 minutes on each side or until cooked through.
5. Brush with barbecue sauce during last few minutes of grilling time.

Tips:
* Lightly oil the grill. Use a barbecue basting brush to apply a thin coat of vegetable oil to the grill to prevent sticking and charring.
* Make sure the grill is hot. The high heat will sear the meat on the outside, giving it that great flavour and sealing the juices inside to keep it moist.
* Don't use a fork. Piercing the food will release the delicious juices.
* Go easy with the spatula. Pressing down on the meat squeezes out its flavourful juices, causing the meat to dry out, and can also cause dangerous flare-ups. Also, turn meat only once during cooking to ensure good searing.
* Baste at the proper time. Brush with barbecue sauce only during the last few minutes of grilling. Because barbecue sauces contain sugar, they'll burn if added too early.
* Use an instant-read thermometer to check if done. Boneless chicken breasts should reach 165°F, while bone-in chicken pieces should reach 170°F.
* Remove cooked meat from the grill and place on a clean plate immediately. Cover with foil to keep juicy.

Note: I do not like Caesar salad and I love this recipe. You can't taste the Caesar dressing. So, if you don't like Caesar salad, don't let that throw you. This is the easiest marinade ever. I don't actually measure, I just eyeball it. You have no idea how long I've waited to be able to say that. Seriously, I measure everything.

I've highlighted what we think are the biggest tips. Follow those 3 tips to a T and you'll be a grilling guru in no time.

Happy grilling!

Friday, 12 December 2008

Wrenikje Recipe

As requested, here is the recipe for wrenikje (cottage cheese perogies) that I got from my mom who makes awesome perogies.

Dough
4 cups flour
2 cups light sour cream (1 small container)
2 egg whites

Filling
4 cups dry curd cottage cheese (1 large container)
2 egg yolks
salt & pepper to taste (1 - 2 tsp)

Mix dough ingredients (love my KitchenAid!), roll out, top with filling, cut & seal (love my perogy cutter!). If you freeze them first there should be less chance of them opening up.

Then boil and serve if you like them that way. Or boil and fry if you like them that way. I fry mine just using Pam so I can pretend it's healthy.

With the leftover dough, we make empties - boiled and fried as well - we nicknamed them "heart attacks".

Last time I made these the recipe made 46 perogies and 8 "heart attacks" - enough for 2 meals for our family (when I make them alongside farmer sausage and corn)

Gravy
2 tbsp margarine
2 tbsp flour
milk (may 1 1/2 cups?)
salt and pepper to taste
sausage drippings

Melt margarine in a saucepan on medium heat, add flour to form a roux, stirring like this for one or two minutes to "cook" the flour. While whisking the entire time, slowly add milk. Stir continuously (or milk will burn) until it boils at which point gravy will thicken. If it is too thick, gradually add more milk until it is the desired consistency. Add in sausage drippings (if you have) and season to taste.

Serve over perogies, noodles or rice.

Enjoy!

Wednesday, 10 December 2008

Menu Wednesday

Here's Menu Wednesday as promised!

Just to make you jealous, here's some of the places we ate out on the weekend - Paradiso, Ruby Tuesdays, Chili's, Green Mill, and Johnny Carino's. Carino's was amazing! This was the first time we'd been and it was sooo good. Definitely going back there.

Anyway, here's the menu for the rest of the week....

Wednesday - Rachael Ray's Chicken with Mushroom-Dijon gravy (but with no dijon cause I don't have any).
Thursday - wrenikje (cottage cheese perogies) and sausage (which I practically don't have to make cause they're in the freezer!)
Friday - spaghetti
Saturday - probably tacos
Sunday - probably homemade subs - has to be a quick one before the SS Christmas concert!

Tuesday, 2 December 2008

Best school lunch idea EVER!

A few weeks ago at a girls night out with the ladies from our now-broken-up-bible-study group, we were discussing meal planning (hence my renewed effort to plan meals - Menu Monday!) and school lunch packing, and somehow the fact came up that my awesome pizza dough recipe made enough for 3 pans of pizza and I only need 2 pans for supper and some leftovers. I've never had much luck freezing dough and using it later. So Pam (the cooking guru!) gave me a wonderful idea!!!

She said to roll out the remaining dough and top it with pizza toppings, roll it up and cut it (like cinnamon buns), then bake and freeze - voila! Pizza pinwheels - perfect for school lunches.

Our kids absolutely LOVE them!!

So, thank you to Pam for the great idea - and now I am passing it along to all of you in bloggyland!

Monday, 1 December 2008

Menu Monday

Monday - homemade chicken fingers and fries
Tuesday - sweet n' sour sausage and rice
Wednesday - tacos
Thursday - spaghetti and focaccia bread
Friday - supper with the inlaws
Saturday through Tuesday - restaurant meals cause we're going away for the "weekend"!!!

So, next week will be Menu Wednesday I guess :)

Monday, 24 November 2008

Menu Monday

2 posts in 1 day?! Pick your jaw up off the floor and read on...

OK, so I've decided that I have to get back to menu planning because it's just ridiculous to wait until 4:45 pm every day to decide what to make for supper that night. I've done it for 2 weeks now and I'm going to start posting Menu Mondays! (I think you'll notice we tend to have the same boring things over and over again :)

Monday - chicken and mushroom sauce over noodles, peas, garlic bread
Tuesday - wrenikje (perogies with cottage cheese inside) and sausage
Wednesday - tacos
Thursday - hopefully a quick restaurant meal - we want to go see "Boy in the Striped Pajamas" (the kids will have babysitter food - either pizza pops or sandwhiches)
Friday - homemade pizza

There ya have it. OK, I know I didn't do Saturday or Sunday - but hey, 5 out of 7 ain't bad!

And, yes, I am making those perogies from scratch myself - I'm pretty good at it too, if I do say so myself :)

Now, I better get defrosting that chicken....

Edited to add: we ended up having chicken fingers and fries instead - kids request. I tried a new chicken finger recipe and it was awesome!!!

Here it is...
1lb chicken breast (I just used 2 large ones)
1/2 cup flour seasoned with paprika, oregano, pepper, italian seasoning, seasoning salt
2 eggs, beaten
2 1/2 cups corn flakes processed in the blender along with a little more of the above spices
2 tbsp margarine
2 tbsp oil

Flour the chicken, dip in egg, roll in corn flakes. In a skillet on medium high heat, heat margarine and oil. Fry chicken for approx 5 mins on each side. If you can't fit all the chicken in at one time, reserve some margarine/oil for the 2nd go round otherwise the 2nd batch won't taste quite as good/unhealthy. You could also bake these for a healthier version - but they won't taste the same! :)

LinkWithin

Related Posts with Thumbnails