Thursday, 20 September 2012

Book Review: Taming the Wind by Tracie Peterson

About the Book: A young widow nursing the wounds of her past…

A cowboy with demons of his own…

Though grateful for the blessing of her daughter, Carissa Lowe has accepted that widowhood is her lot in life. Bound by fear and mistrust, she feels incapable of opening her heart again.
Tyler Atherton has never forgotten Carissa. When he discovers she’s living with her sister on a nearby ranch, his life becomes intertwined with the lovely widow’s. And Carissa’s daughter, Gloria, seems determined to wrap herself around his little finger. But while Tyler longs to provide a home and future for Carissa, he is haunted by an obligation he feels unable to fulfill.
Challenged by mounting hardships, can Carissa and Tyler preserve their fledgling love in a land as unforgiving and vibrant as the people who call it home?

My Thoughts: Historical fiction is definitely one of my favourite genres and this one hit the nail on the head once again, not a surprise for anyone who's read Tracie Peterson's work before.  

This book deals with some serious issues, but does not come off as heavy at all.  I love it when authors accomplish that - when something that feels almost like mindless entertainment, ends up providing you with wonderful food for thought.  This book is about healing, about giving your pain to God, and about love being a risk worth taking.  

Thank you to Litfuse Publicity for organizing this tour and providing me with my complimentary review copy.


Book Review: Unending Devotion by Jody Hedlund

About the Book: Michigan, 1883 - Lily Young longs to find her lost sister or will die trying. Heedless of any danger, she searches logging camps and towns, posing as a photographer’s assistant. And then she arrives in Harrison, Michigan–and the sights of Connell McCormick.

Connell is determined to increase the fortune of his lumber-baron father and figures as long as he’s living an upright life, that’s what matters. But when Lily arrives in town she upends his world, forcing him to confront the truth that dangerous men have gained too much power while good men turn a blind eye.

Vexing but persuasive, Lily soon secures Connell’s help, drawing them ever closer to each other. Will standing for what’s right cost them both everything?

My Thoughts:  I loved this book.  Loved it.

The main characters were so believable, because they were not perfect.  They each had strengths and weaknesses and both Lily and Connell grew in character because of the other's strengths.  And isn't that exactly what a marriage is supposed to be?  (I guess that's a spoiler, but really, we all know they're going to end up together)  Iron sharpening iron.

What I love about Lily is her determination to stand against evil no matter the cost.  When good men do nothing, evil flourishes.  We cannot let fear, loss of material gain or anything else, stop us from standing up for what's right.  Now, there are also foolish ways of going about doing that, a lesson Lily learns too, but the principle is bang on, and if more people were willing to take a stand like that, we'd see change beyond what we could even imagine.

I found this story very inspiring and well-written.

Thank you to Litfuse Publicity for organizing this tour and providing me with my complimentary review copy.

Monday, 10 September 2012

Not Me Monday - School

I don't know about you, but I am always super organized and always know exactly what is going on in my kids schedules - especially when it comes to the starting up of the brand new school year and all the extracurricular activities that come along with it.

It goes without saying then that I would be completely organized for the beginning of dance classes and there's no way I would've forgotten that last year dance class actually started a couple of days before school started.  No, not me!

I didn't only remember that fact on Monday evening as we were going to bed and I definitely didn't have to quickly start up my MacBook in order to check on the website what day dance classes started, only to realize that they start Tuesday.  As in that Tuesday.  As in the very next day.  Nope, not me!

I wouldn't need to be thankful Emma's stuff all fit well enough to wear and have to quickly whip over to Walmart during her class in order to buy Olivia's ballet shoes before her class started an hour later.  Nope, no me!

And obviously, even if I were to have done any of that, that certainly would be the only organizational mishap to happen the first week of school.

I wouldn't have delayed ordering labels until less than one week before school started and end up having to pay for next day shipping in order to get them in time.  No, not me!

And even if all that had happened, I definitely would not miss out on Meet the Teacher and the opportunity to drop off school supplies because I thought it was on Wednesday when it was actually on Tuesday.  Nope, not me!

Book Review: Over the Edge by Mary Connealy

About the Book: Seth Kincaid survived a fire in a cave, but he's never been the same. He was always a reckless youth, but now he's gone over the edge. He ran off to the Civil War and came back crazier than ever.

After the war, nearly dead from his injuries, it appears Seth got married. Oh, he's got a lot of excuses, but his wife isn't happy to find out Seth doesn't remember her. Callie has searched, prayed, and worried. Now she's come to the Kincaid family's ranch in Colorado to find her lost husband.

Callie isn't a long-suffering woman. Once she knows her husband is alive, she wants to kill him. She's not even close to forgiving him for abandoning her.

Then more trouble shows up in the form of a secret Seth's pa kept for years. The Kincaid brothers might lose their ranch if they can't sort things out. It's enough to drive a man insane--but somehow it's all making Seth see things more clearly. And now that he knows what he wants, no one better stand in his way.

My Thoughts:  Despite delving into topics as solemn and serious as robbery, murder, nightmares, childhood trauma and war, Mary Connealy manages to make this a fun book to read!

The characters are realistic, entertaining and likable - I especially like feisty Callie! The storyline is intriguing (I read it all in one sitting!) and even though this is the 3rd (and final) book in the series, it was easy to follow even if you hadn't read the first two books (like myself).


Thank you to Litfuse Publicity for organizing this tour and providing me with my complimentary review copy.

Monday, 3 September 2012

Not Me Monday

When I invite company over for lunch, I'm always careful to make delicious food and would certainly never burn something.  Nope, not me.

I try to make things everyone will like and pizza buns is always a hit, but I would never so busy with other lunch fixings that I would forget that they were under the broiler.  Nope, not me.

I wouldn't detect a faint odour that signaled to my brain that something was wrong.  And obviously I wouldn't have to rush to the oven, yank open the door and pull out burnt pizza buns.  Nope, not me.

And I most certainly wouldn't serve them anyway because I didn't have enough extra ingredients to make a fresh, non-burnt version and justify the decision by reasoning that we were all too hungry to wait anyway.  Nope, not me.

I wouldn't simply scrape off the burnt edges and tell the kids they would taste just fine, before even tasting them myself.  Oh no, not me.

I wouldn't taste them myself only to realize how horrible they actually were, forcing me to have to pick off the worst of the burnt cheese so they were somewhat edible. No, not me.

It follows that I also wouldn't tell the kids they didn't have to finish their pizza buns and allow them to fill up on chips as that would be very unhealthy and I never let my kids even have junk food, never mind fill up on junk food.  No, not me!

And I most certainly wouldn't post a picture of said burnt pizza buns for all blog world to see.  No, not me.

And I definitely would not publicly admit that I'm very glad the company was my sister.  No, not me! ;)


For more Not Me Monday posts, click here.

Sunday, 2 September 2012

From Pinned to Practice #1


Inspired by my sister's From Pinned to Practice series, I've decided to start doing the same thing.  I, too, have fallen for the lure of Pinterest but have also fallen prey to the same tendency as many others have (tell me I'm not the only one!) - and that is to pin and pin and pin, but never actually try all those wonderful ideas!

I have already tried out a few of them, but I will be determined to try more - hopefully at least one a week.

So, here's the first installment of my rendition of From Pinned to Practice!

And, surprise, surprise - it's a recipe.

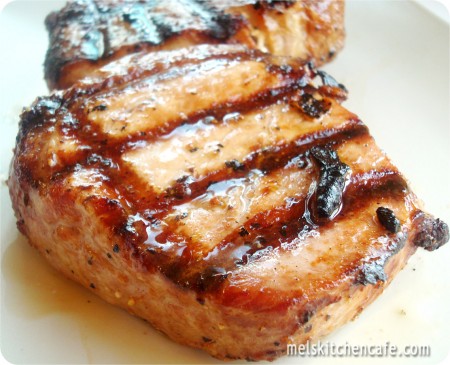
Grilled Pork Chops by melskitchencafe.com


INGREDIENTS:
4 boneless pork loin chops
1/4 cup olive oil
2 1/2 tablespoons soy sauce
1 teaspoon steak seasoning (such as Montreal Steak Seasoning or make your own*)

DIRECTIONS:
Mix olive oil, soy sauce and steak seasoning ingredients in a small bowl and pour into a one-gallon resealable plastic bag. Add the pork chops and set the bag in a baking dish in a way that the pork chops get a healthy dose of the marinade (it may be advantageous to flip the bag over halfway through the marinating time). Marinate in the refrigerator for 3-8 hours (no more than 8). Heat the grill to medium and grill the chops 6-8 minutes per side (depending on how thick they are) until they are no longer pink in the center. Remove the chops from the grill and tent them with foil and allow them to rest for 5-7 minutes. Slice the chops in 1/4 to 3/8 inch slices across the grain and serve.


I tried the recipe exactly as is, and LOVED it! (Well, Nathan did the grilling - he's amazing at it).

Top picture is the original pin, bottom picture is our reality.  


Happy pinning and practicing!


Tuesday, 28 August 2012

Sesame Street Characters Cupcake Tutorial

I've posted a detailed 4 part series on how to make the Sesame Street Character Cupcakes that I made for my nephew's 1st birthday party, but thought it might be a good idea to post a condensed version here, to make it easier for someone doing all four characters - Elmo, Cookie Monster, Oscar and Big Bird (for the detailed version, click on the preceding links).  Once again, thank you to Emma (11 yrs old) for helping me with the facial features on Elmo, Cookie Monster and Oscar, and Sophia (9 yrs old) for being my tutorial photographer.

Supplies Needed
cupcakes: my Hershey's awesome chocolate cake recipe here
icing: delicious icing recipe here (I use a little bit of cream cheese to cut the sweetness)
Wilton no taste food colouring - red, yellow, blue, green
white chocolate wafers (candy melts) - two per cupcake
chocolate icing for pupils
light blue icing (small amount)
light pink icing (small amount)
chocolate chips
orange peanut M&Ms
Oreo cookies
mini chocolate chip cookies - one for each Cookie Monster
marshmallows - one per Big Bird cupcake
red fruit roll up
star tip
leaf tip (optional but awesome for Big Bird's feathers)
round tip
icing bags (make your own like I do - see tutorial here)

Pipe red icing onto the cupcake using a star tip.  
Break apart some Oreo cookies, remove the icing (eat it!) and split them in half. One Oreo goes a long way - in case math isn't your strong suit, one Oreo makes 4 smiles! Place the Oreo smile near the bottom of the cupcake.
Add two white chocolate wafers (sometimes also called candy melts) which are basically pieces of white chocolate that look like Elmo eyes. Place them protruding slightly off the top and make sure they're touching.
Using a small round tip, pipe chocolate icing on Elmo's eyes - for the most realistic eyes, make sure to pipe the pupils in the centre and slightly cross-eyed. 
 Then place an orange peanut M&M in between the eyes. If you have peanut allergies, other options would be orange jelly beans or other orange coloured candies. And yes, I totally picked through our local grocery store's bulk bin section, only taking the orange ones!
And voila!  Elmo!


Pipe blue icing onto the cupcake using a star tip.
Place white chocolate wafers (candy melts) at the top of Cookie Monster's head 
Then shove a mini chocolate chip cookie into Cookie Monster's "mouth area". 
Using a round tip, pipe chocolate icing onto the white chocolate wafers, making sure the pupil is at the bottom right "corner" for the left eye, and the top left "corner" for the right eye.
And voila! Cookie Monster!


Pipe green icing onto the cupcake using a star tip.
Break apart the Oreos, scrape off (and eat!) the icing, break the Oreos in half and shove the cookie right into Oscar's mouth area. You want him to look like he's grimacing, not smiling! I tried the upside down smile-turned-frown, but that just looked weird. We did this and it worked for me! 
 Also put the white chocolate wafers (aka candy melts) on for his eyes. Oscar's eyes are not on the top of his head like Elmo and Cookie Monster, so make sure to put them lower down, and make sure they are not touching each other. Perfectionist, anyone?! 
I wasn't sure I'd have enough chocolate icing left to use for Oscar's unibrow, but Emma came up with a fantastic idea - use upside down mini chocolate chips! Stagger them close together to get that accurate bushy unibrow. 
Pipe chocolate icing for the pupils - centred and not as cross-eyed as Elmo's. 
And voila! Oscar the Grouch!


Note:  Big Bird takes forever!  Consider yourself warned.

Now, technically you could just pipe yellow icing on top of the cupcake like we did with the other characters, but not if you're wanting realistic looking feathers!
So, first start by taking a large marshmallow and cutting a triangle off one end to make the beak shape.  I also ended up trimming the bottom off slightly because it looked too tall.  This also had the added benefit of exposing the sticky inside of the marshmallow, helping it to stick to the cupcake.  You could also make it stick by applying icing in between the marshmallow and the cupcake, but I found that this was sufficient. Make sure to place the beak near the bottom of the cupcake to leave room for the eyes and for the proportions to look right.
Next, take some red fruit roll up (Fruit by the Foot) and put it on the inside of the marshmallow beak, trimming it to the right shape.  I found I had to take the marshmallow off to do this well, but you  might be able to do it with it on.
Next, slather some yellow icing on the outside of the beak and smooth it out as best you can with a knife dipped in warm water.
Using a leaf tip, pipe yellow icing on the cupcake in layers, starting with the outside and working your way in. Totally looks like feathers!!
Place the white chocolate wafers (aka candy melts) on top of the beak and have them slightly separated.  Then, using a round tip, pipe light blue icing as the lower eyelid, light pink icing as the upper eyelid (both directly on top of the white chocolate wafer) and chocolate as the pupils, near the bottom of the eye and very slightly cross eyed.
And voila!  Big Bird!


With that, may I present to you the Sesame Street Character Cupcakes - Elmo, Cookie Monster, Oscar the Grouch and Big Bird!


Big Bird: Sesame Street Characters Cupcake Tutorial - finale!

Yes, I saved the best for last.  Or rather, the worst.  By far the worst.  You have no idea.  Well, you will if you try this.  Big Bird was almost the death of me.  Actually, scrap that.  I almost killed Big Bird.

Hey, nobody said this was a kid-friendly post.

Either way, yes, this is the finale to my Sesame Street Character Cupcake Tutorial.  So far we've done Elmo, Cookie Monster and Oscar the Grouch.  All three of these characters were fairly simple and followed the same basic steps - star piped icing and awesome candy facial features.  But with Big Bird, we're moving into different territory.  Don't say I didn't warn you.  Big Bird took me longer than Elmo, Cookie Monster and Oscar put together.

That being said - here goes!

For Big Bird you will need....
cupcakes (see subtle hint recipe here)
one large marshmallow per cupcake
red fruit roll up
icing coloured with Wilton's no taste yellow food colouring
two white chocolate wafers (aka candy melts) per cupcake
light blue icing (small amount)
light pink icing (small amount)
chocolate icing (small amount)
leaf tip


Now, technically you could just pipe yellow icing on top of the cupcake like we did with the other characters, but not if you're wanting realistic looking feathers!

So, first start by taking a large marshmallow and cutting a triangle off one end to make the beak shape.  I also ended up trimming the bottom off slightly because it looked too tall.  This also had the added benefit of exposing the sticky inside of the marshmallow, helping it to stick to the cupcake.  You could also make it stick by applying icing in between the marshmallow and the cupcake, but I found that this was sufficient. Make sure to place the beak near the bottom of the cupcake to leave room for the eyes and for the proportions to look right.

Next, take some red fruit roll up (Fruit by the Foot) and put it on the inside of the marshmallow beak, trimming it to the right shape.  I found I had to take the marshmallow off to do this well, but you  might be able to do it with it on.

Next, slather some yellow icing on the outside of the beak and smooth it out as best you can with a knife dipped in warm water.

Using a leaf tip, pipe yellow icing on the cupcake in layers, starting with the outside and working your way in.

Totally looks like feathers!!


Place the white chocolate wafers (aka candy melts) on top of the beak and have them slightly separated.  Then, using a round tip, pipe light blue icing as the lower eyelid, light pink icing as the upper eyelid (both directly on top of the white chocolate wafer) and chocolate as the pupils, near the bottom of the eye and very slightly cross eyed.


After about 3 1/2 hrs of work, don't they look fantastic?!


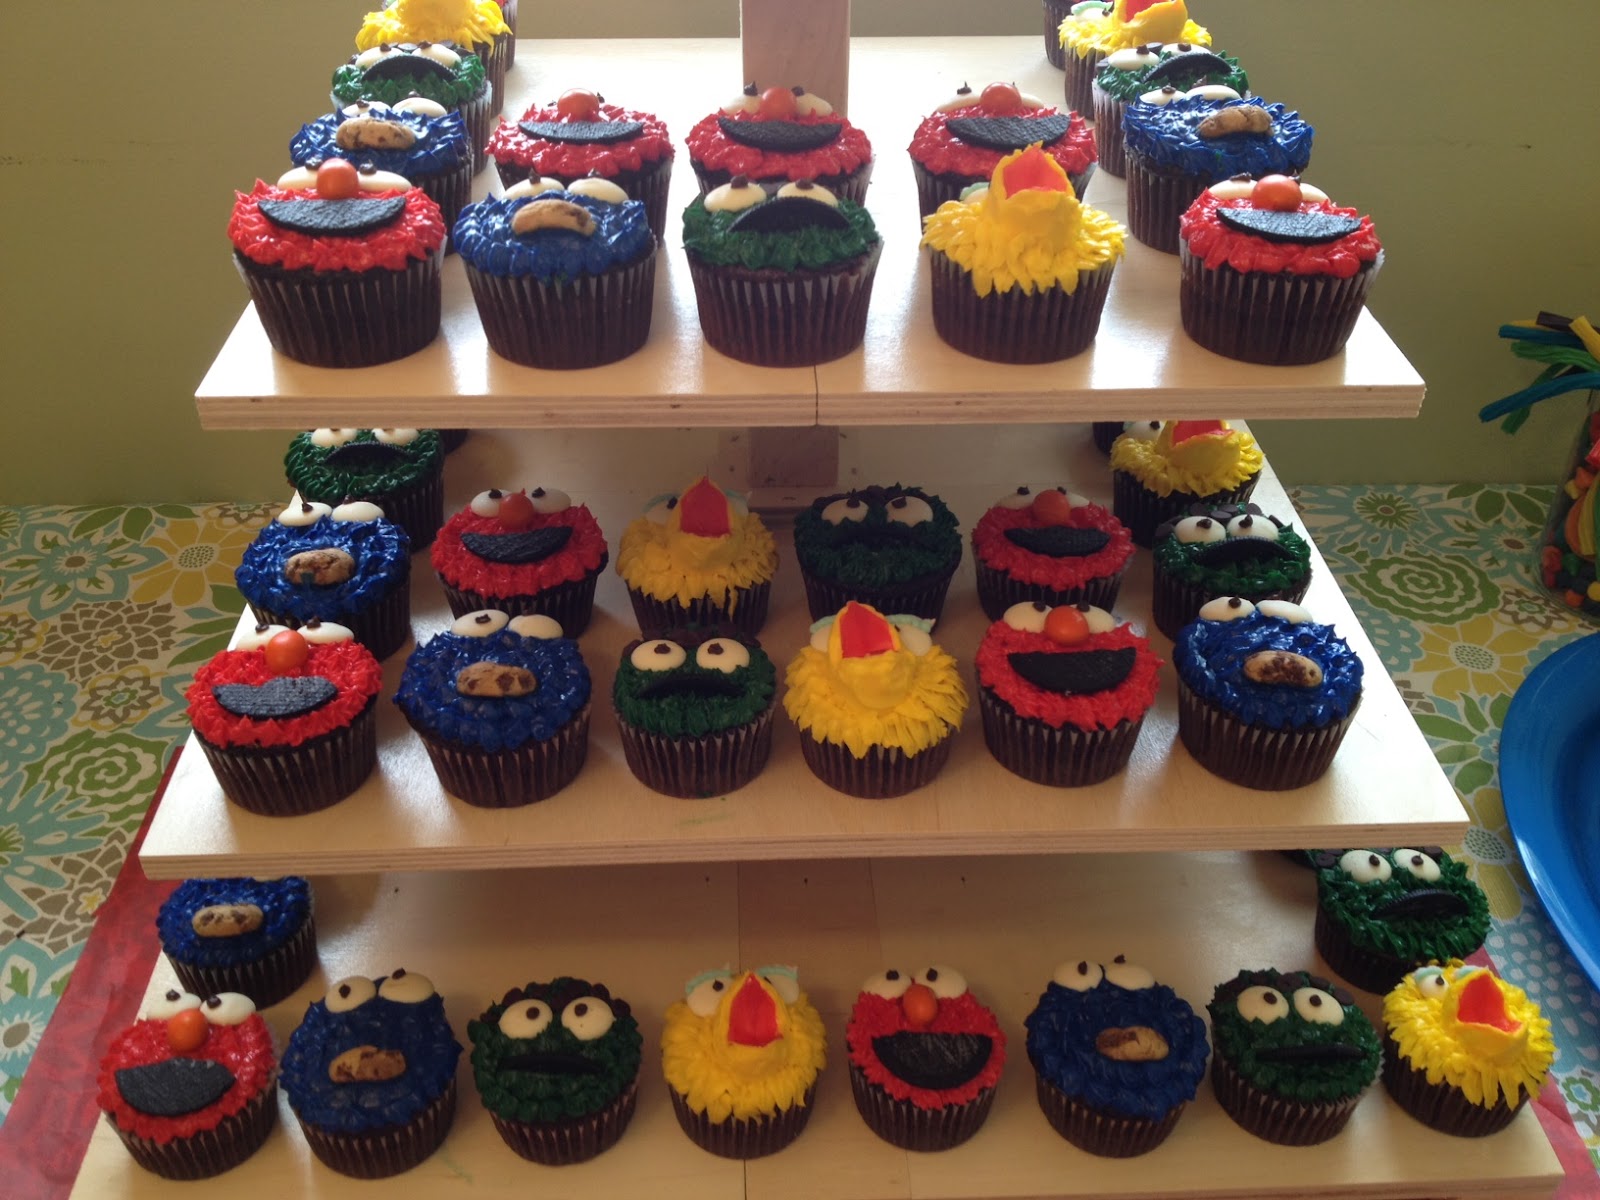
And here are all four characters displayed together at the party (my brother made the tiered cupcake holder).

 Aren't they adorable?!

And, other than Big Bird, they're actually surprisingly easy to make!


DIY Ziplock Icing Bag Tutorial

I used to have a reusable icing/pastry bag, but the hole at the tip wore out so much the shaped tips slid out too much and icing oozed out the sides.  Not exactly conducive to decorating with any sort of detail.  I found a rather inexpensive set at the local grocery store and figured it was worth a try.  Yeah, not so much.  So, there I was, about to decorate 60+ cupcakes with no icing bag.  

Insert panic mode here.

So, I improvised, and it worked like a charm!  So, here are instructions on how to make your own icing decorating bag out of a large zip lock bag.

First reinforce the two sides with tape to prevent the seems from splitting as you squeeze out the icing. Do not skip this step.  If you do, make sure you decorate cupcakes with said faulty icing bag out of earshot of any impressionable children.  Or be prepared to have a tongue that hurts from biting it shut. Your choice. 

Trust me.  Your bag will split.  Icing will be everywhere.  Ask me how I know. 

Thankfully I already learned that lesson previously, so no extra panic was added to this particular venture.


If all you need is a round tip, simply snip the corner tip off to size.  

If you're needing a shaped tip, you can try cutting that yourself (ha, ha, ha) or simply snip the corner off (make sure the tape goes all the way to the snipped portion), large enough to insert the coupler.  Attach the pastry tip you've chosen to the pastry coupler and tighten the coupler ring over the tip, just like you would when using a "real" decorating bag.  As an extra precaution to avoid oozing icing and sore tongues, tape the outside of these joints well.


Fill your pastry bag with icing and you're ready to roll!


Monday, 27 August 2012

Not Me Monday

This didn't happen today, but I've been thinking for awhile that I should do another of those "Not Me Monday" posts, so here goes.

I did not drive my daughter to the wrong house for a birthday party.  Not me.  Especially because I've been to this particular house several times before and would obviously recognize it.

And I certainly didn't knock on the wrong house and stand impatiently waiting as no one answered.

And I didn't go back to the van trying to remember this friend's phone number because I wouldn't have left the invitation sitting on the kitchen counter at home - because I've been to this house and did not need directions.

Therefore, I did not have to drive back to my house to get the phone number.  Not me.  And I didn't phone up the friend and ask them why they weren't answering the door when we came to the party.

I didn't drive back, to the wrong again, because that would be ludicrous!  I didn't doublecheck the street (bay!) address and even though I couldn't see the house number I didn't assume it was the right one - because we all know what assume means.

I didn't march back up the driveway and ring the doorbell and knock again on the wrong house, even after noticing that I thought it was odd that they had removed their neat school bus shaped garbage bin holder from the end of their driveway.  Not me.  I have a firm grasp of the obvious and would never put two and two together to make 5.

I didn't have to try to mask my growing irritation as I asked my daughter how much she really wanted to go to this birthday party.  Not me!  I'm the epitome of patience and grace, always.

I didn't call the parents back again to tell them politely but stiffly that they still weren't answering the door.  To which I obviously would not have heard them tell me that I was at the wrong house and the dad was on his way to direct me to the right one...... on the other end of the bay.

No, not me.

I didn't watch in horror as said dad's van pulled in behind me while still on the phone, and therefore did not meekly have to follow him to his house, that I've been to numerous times.  Not me.

I didn't have to apologize profusely and wonder at my own idiocy, not me.

And I certainly was not annoyed at myself for wasting 1/2 an hour of an incredibly busy day driving my daughter to a party that was only a 2 minute drive away.  Nope, not me.


LinkWithin

Related Posts with Thumbnails